How to change the sealing rubber (cuff) on the washing machine?
Replacing the cuff in a front-loading washing machine may be necessary for a variety of reasons, but for this task it is not necessary to call a master. You can change the rubber band at home without any special tools in any machine, whether it is a model from Indesit, Samsung, LG or another brand. The procedure takes about 30-60 minutes and will save you money if you understand exactly how to replace the cuff.
Causes of damage
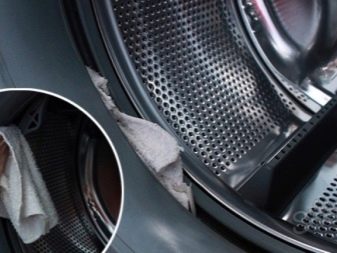
Replacement of the cuff is most often carried out due to the appearance of tears or cracks on the seal, leaking water during washing. As a result of the formation of such damage, the owner of the machine will see under the hatch water leaks, and upon examining the cuff itself, will notice cracks or tears, which may have different sizes. Causes of this situation can be the following factors:
- Natural wear and tear of the seal. During the operation of the machine, the cuff is constantly subjected to the friction of the drum and the laundry. It heats up during washing and then cools down. It is also affected by detergents. Over the years, this causes the rubber to become brittle and brittle.
- Poor-quality laundry detergent. Exposed to cheap powder and detergents of dubious quality, the rubber of the cuff begins to deteriorate, so saving on powder leads to the cost of replacing the seal.
- Detergent over dosage. Using too much powder or liquid detergent can also damage the structure of the cuff rubber, causing the cuff to have to be replaced.
- Items of clothing that can damage the seal. Such elements can be metal and plastic fittings. In addition, screws, nails, and other objects can get into the machine from clothing pockets and cause a tear in the cuff.
Over time, if the sealing cuff is not cleaned, mold can build up on it. Therefore, it is necessary to periodically clean the washing machine. How to do it, you can see in the following video.
How to remove?
- Prepare for the work a flat screwdriver, and if your machine is old, then round pliers. In addition, do not forget to de-energize the machine and disconnect it from the water supply.
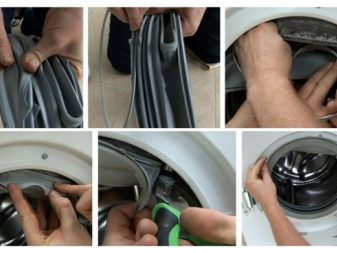
- First remove the door from the machine, as well as the hatch lock. Your basic steps for disconnecting the cuff will be to remove the clamps used to secure the cuff to the front of the machine and to the tank body.
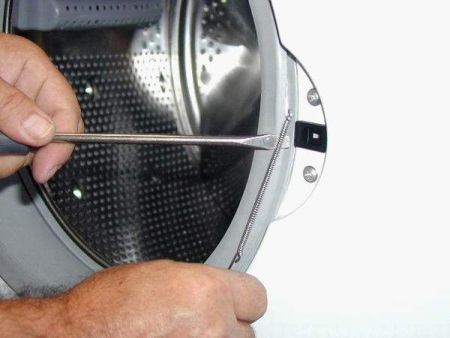
- Carefully unscrew the front edge of the cuff, then loosen and remove the first clamp. If this part is plastic, it is secured with latches, and the clamp made of metal is fixed with a screw or spring, which should be removed with a screwdriver. The screw should be unscrewed, and the spring - a little pull and loosen. By picking up the clamp with a screwdriver, it can be removed. If the machine is an older model, there are no adjusting bolts or latches in the design of the clamps, and to remove such clamps, you will have to work with round pliers.
- Your next step is to carefully detach the front of the rubber gasket. It is held in the machine by its shape and its own tension.
- After that you need to proceed to disconnect the second clamp. Sometimes this task requires you to remove the cover of the machine housing. Using a screwdriver, unscrew the bolt of the collar or simply slide it off. The collar can then be removed from the machine.
How to replace it?
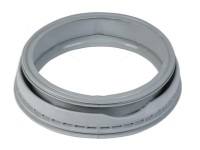
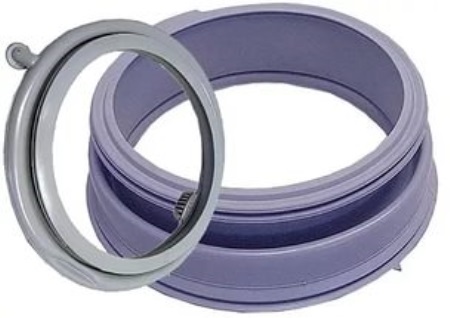
First of all, you should buy the seal you need. Since cuffs from other models of machine may not fit yours, even if they look the same, be sure to tell the salesperson when buying the seal the model of washing machine to which you are going to install the cuff. Only after making sure that the purchased cuff is exactly the same as your damaged cuff can you proceed with the replacement, which includes the following steps:
- Clean the lip of the tank of contaminants (salts, powder, and others). You will need a warm soapy solution for this task. After removing all the dirt, do not wash off the film formed by the soap solution treatment, as it will help in the installation of the new cuff.
- Install the sealing rubber on the tank. Keep in mind that doing this with a new rubber will not be too easy. Place the top of the gasket against the tank (its top edge) so that the marks align, then use your two thumbs to tighten the cuff. To do this, your fingers should slide from the center to the sides. This will prevent the cuff from slipping at the bottom and will fit over the entire lip.
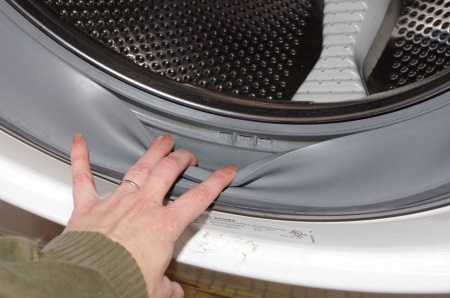
- Check that the cuff is correctly positioned. The water drain holes should be centered strictly on the bottom and the tab, which is found on most rubber bands, should be at the top. In addition, once the rubber band is installed, there should not be any gaps, as a loose fit can cause leaks.
- Tighten the inner clamp. You need to proceed depending on the attachment of the clamp. If it is secured by a tensioned spring, you need to put the spring part of the clamp on the screwdriver (if you have not removed the front wall, slip the screwdriver into the lock hole). This way you can freely stretch the spring and put the clamp in its place. If tightening with a screw, simply unscrew the screw, put the clamp in its place, and then tighten the screw to the desired force. An even easier way to tighten would be to use a plastic clamp held in place by snaps. If your model of machine has a wire clamp, gently tighten the ends of the clamp with round pliers and then slide the assembly into the recess in the cuff.
- Put the sealing rubber on the front wall and tighten the second clamp. All manipulations with the second clamp are carried out in the same way as with the inner clamp, depending on the peculiarities of its attachment.
- Check the tightness of the installed collar. To do this, turn on any short washing program without loading the laundry in the machine, and make sure that the water does not flow out of the bottom of the cuff.

It also happens that the front panel on the washing machine is not removable. This is not very convenient for replacing the cuff. There is a way out of this situation and the following video describes and tells in detail how to replace the sealing collar on such washing machines.
Tips
To prevent damage to the cuff due to metal locks and other fittings on clothing, use special bags for washing things with plastic or metal elements. If you do not have a bag, turn the locks inside out of the garment.
In addition, it is important to always inspect the pockets of things before loading them into the washing machine to prevent any objects that can cut the rubber seal from getting inside the machine.


