How to install the floor toilet
Replacing the toilet is an important step in the repair of the sanitary unit. In this case, it is not necessary to turn to professionals. Perform the installation of a floor toilet is quite possible by yourself.
Tools
Gather the necessary set of tools and auxiliary materials:
- A hammer drill, or a drill with percussion mode of operation;
- Drill with a diameter that will correspond to the size of the dowel to install the toilet;
- Drill bit for working with tile. It will come in handy in case there are tiles or tile on the floor;
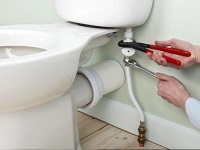
- Wrenches;
- Hammer;
- Quality sealant (in a tube or in a gun);
- A set of screwdrivers;
- A set of sturdy wrenches;
- Adapters to connect to the pipe of cast iron (if required);
- Fasteners that the toilet bowl manufacturer did not include in the kit;
- Several rags, a basin or bucket for water.
Preparations
Do not rush into the installation right away. First, decide exactly how your toilet will connect to the sewer system.
There are three options available today:
- A corrugated pipe for the toilet bowl.. Such a collar is economical, but you can not connect the plumbing to the sewer. This is an important point when the room is compact.
- Straight sleeves. Guarantees a strong and sufficiently tight connection, there are virtually no disadvantages.
- Eccentric. Relevant in cases where the output toilet and sewer inlet are offset with respect to each other.
Take care of the availability of adapters, if they are required. The threads may not match, so additional elements will be needed.
Preparing to install a new toilet is, first of all, the dismantling of the old one. Often under the old toilets remains a stand of wooden boards. Remove it, and seal the voids with cement.
Types of installation
It would seem, put yourself a toilet on the floor, fix it with bolts and the matter is over. In fact, it's not so simple.
There are three types of installation:
- On taffeta;
- On bolts;
- On the glue.
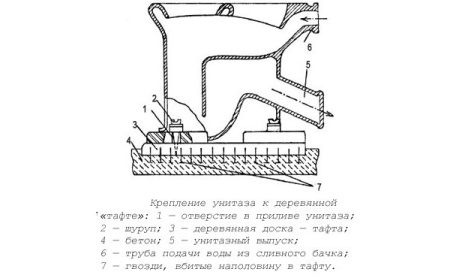
On taffeta.
The classic version, which remains relevant even today. For it you will need strong boards, treated with protective compositions. They must be sunk into the floor, or set at the same level with it. The bottom of the base of a wooden fixed anchors, and the recesses are filled with a solution of sand and cement.
Next is mounting the toilet bowl itself in its new place. For fixing the taffeta need a simple screws. Just do not forget to put a rubber washer under the head, which will protect the ceramics of the toilet bowl.
Screws.
Quite simple, but at the same time reliable way of fixing the toilet bowl. For it you will need to install the product at the future permanent place, through the holes under the fasteners to make marks with a marker or pencil on the floor.
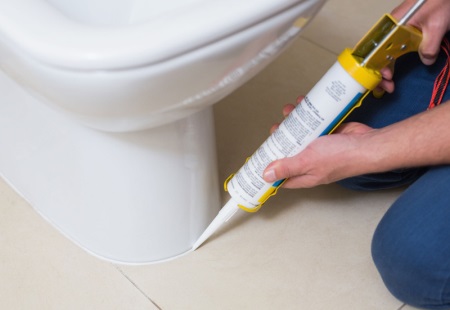
Then the toilet bowl is removed, holes are made, dowels are inserted. Now the plumbing product is returned to its original position, fixed with screws. It is also important to use rubber washers. For better sealing quality, we recommend applying a little silicone under the toilet bowl, as well as seal the edges with it.
On the glue.
Epoxy glue is used in this case. The surface under the toilet is pre-cleaned, treated with white spirit. A similar procedure is carried out with the bottom of the toilet bowl, which it will be fixed on the floor.
Then it is recommended to roughen the surfaces, degrease and dry. Connected utilities, a layer of epoxy adhesive is applied to the surface and the toilet bowl is pressed firmly to the floor. You can put weights on it, and within a day the adhesive will fully cure.
Types of output
Issue in the floor toilets are of three types:
- At an angle - oblique;
- Perpendicular to the floor - vertical;
- Parallel to the floor - horizontal.
Let's study in detail each of them separately.
Vertical .
They are often used in Europe. The spigot and siphon are directed downwards. The convenience of the design is that you can place the plumbing at any angle you choose. Mounting the system is quite simple:
- A marking is made on the floor, a screw flange is mounted, which has a special detent;
- In the center of the flange has a hole, where the pipe leads to the sewer;
- At the flange is placed a bowl, makes a turn until it locks;
- Outlet spigot itself nestled against the pipe, because it provides for the presence of the ring-sealer.
Horizontal
The most popular type of outlet in our country. Explained by the nuances of the design of sewage in our multi-storey houses. Installation is carried out to a certain wall, and the outlet is connected to the sewer outlet with a collar. There are special holes in the legs of the sanitary ware. They serve to securely fasten the product to the floor.
Oblique
Install the toilet bowl in this way in the following steps:
- Lubricate the grooved outlet using a mixture of olive oil and dried oil;
- Wrap a strand of resin on top, not reaching the end of the tube about 5 mm. This way the winding will not get into the drain, thus you can avoid clogs;
- The strand is liberally smeared with wax;
- Then the plumbing is installed and secured outlet spigot in the sewer socket.
Installation in stages.
To understand in detail the correct floor installation of the toilet, it is necessary to consider each step separately.
Dismantling
- The water supply is shut off, the flexible hoses are disconnected, the remaining water in the cistern is drained;
- Disconnect the drain tank. Act on the basis of whether you need the toilet or not. You can do everything neatly, or you can just break it into pieces;
- Speed up the dismantling process will help punch and hammer;
- Make sure that the shards do not fall into the sewer, and do not hurt you;
- Remove the bowl, take everything to the landfill, clean the room.
Removing the taffeta and working with the floor
- After dismantling the old plumbing fixtures, tidy up the socket. It can be rusted, accumulate dirt and deposits;
- At the bell is placed a transition sleeve, made of high quality rubber. Be sure to lubricate it before this sealant sanitary type;
- Seal the hole sewer with a rag to prevent the entry of unpleasant odors;
- Remove the taffeta from the wooden boards, if any;
- Make a filling on the resulting void, using quick-drying cement mortar;
- Make the floor level, using a trowel;
- Wait for the mixture to harden.
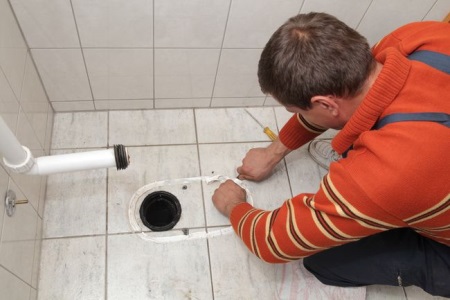
Marking and doweling.
- The bowl is placed in the location of your choice;
- Through the holes in the legs a marking is made for future drillings;
- Having made the markings, remove the bowl, take a punch, make holes and insert dowels in them.

Fixing the tank
- Follow strictly the instructions for the plumbing fixture to perform installation of the toilet cistern;
- Tighten the valve nuts by hand only, without the aid of tools. When doing so, hold the valve with the other hand. This will prevent the valve from turning and also avoid damage to the gasket;
- When installing the valves, avoid contact with the walls of the vessel, as well as with each other.
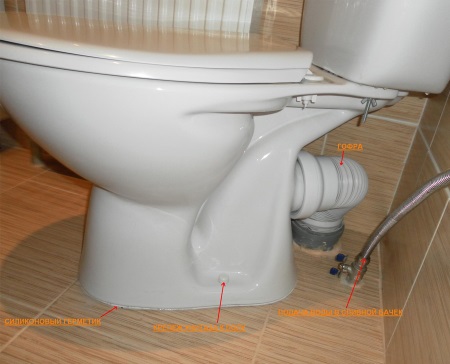
Bowl Installation
- Connect the sanitary fitting sleeve to the transition, and necessarily the petal part of it;
- Outlet of the bowl of the sanitary fitting is fixed in the transitional collar, trying to push it to the maximum stop;
- Rotate the cuff until the toilet is in the desired position and its holes do not coincide with the holes made in the floor;
- The bowl is fixed to the floor with screws. Do not forget to put a protective washer of plastic so as not to damage the product;
- Make sure the floor is level. If not, use plastic or rubber spacers, and only then tighten the screws.
Connecting the tank and bowl
- Before installing the tank on the bowl, make sure to put a gasket between them, treated with sealant. This will prevent future leaks;
- Fix the elements by tightening the fasteners evenly;
- Mount the cover and drain button;
- Connect the flexible hose.

Checking the operation
To make sure that the connection is correct, you should perform the following steps:
- Fill the tank with water and drain;
- The amount of water when draining is adjustable, which is indicated in the product manual;
- Inspect each connected element, make sure there are no leaks. If necessary, treat loose components with sealant and tighten connections;
- If the problem of the leak is a faulty toilet component, then buy a new one and install it.
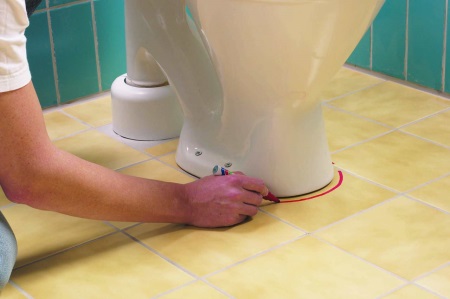
The last step
- Install the seat that comes with the kit;
- The resulting gap between the legs and the floor sealed with sealants;
- Performed a full connection of the water supply, carried out a few more test drains.
As you can see, to put the toilet on the floor with their own hands - a task not particularly difficult. It does not require professional skills or the help of craftsmen.
Of course, if you are not confident in your own abilities, you have no time or desire to do such things yourself, please contact the professionals. Many stores that sell plumbing equipment, incidentally provide services for delivery, installation and subsequent maintenance. Often it is profitable, especially if we are talking about a branded plumbing store. High quality products are accompanied by excellent quality of installation and repair work.


