How to properly lay tiles in the bathroom?
Probably everyone faces a lot of problems before starting to repair the bathroom. For example, how to prepare the room for repair, what materials should be used, what are the ways of laying, etc. To help you address all of these issues, we'll look at each of these points in detail.

Pros and cons
Many people prefer to use ceramic tile as a cladding material, which is still the leader among the finishing materials for the bathroom today. Let's start by looking at all of its advantages and disadvantages.
Advantages:
- Hygienic (the surface is easy enough to wash, in case of heavy pollution you can use chemicals containing acid, without fear that they will damage the tile);
- Durability (if used skillfully enough durable material, resistant to moisture and temperature changes);
- Durability (if you put tiles in the bathroom, you can be sure that they will be boring for dozens of years, rather than falling into disrepair);
- A huge variety of colors and patterns;
- A wide range of prices (you can choose a domestic tile manufacturer with a simple pattern at a reasonable price or expensive original tiles from Western manufacturers).
Disadvantages:
- Lengthy installation process;
- Expensive installation.
The main factor in the process of laying tiles is professionalism, because without special skills in working with tiles you risk ruining the entire material or, in the end, get a result that, to put it mildly, you will not be happy with. Therefore, most people prefer to pay a lot of money to a specialist in order to avoid additional costs to correct their mistakes or to purchase additional materials, thereby making their lives easier.
If you still decided to lay tiles yourself, our tips will help you cope with this task.

Ways to lay tiles in the bathroom
With different ways of laying tiles, you can not only transform, but also visually hide the shortcomings of your bathroom.
Read more about this in our article on Tile Ways to Decorate Your Bathroom.

So, tiles can be laid in several ways:
- Direct laying. Perhaps the easiest way, which will be possible even for beginners. If you have a low ceiling, "raise" it will help a rectangular tile, laid in this way.
- Laying in a checkerboard pattern. Laying tiles of two colors, which allows you to visually expand the space.
- Diagonal laying. This method of laying requires special skills and additional calculations. By laying tiles on the floor in this way, it is possible to disguise uneven walls.
- Laying with an offset. Each next tile of the row is laid with an offset from the previous row. It is best to use rectangular tiles, whose length is twice the width.
- Mosaic. Set up such a mosaic can only be done by a professional. However, if you are a motivated and creative person, you have every chance to master this craft. In addition, the bathroom, made with the use of the author's patterns and ornaments made of ceramics, will look original and creative.
Calculations for the purchase of materials, necessary tools
Now that we have decided on the form of tiles and the method of laying, it is necessary to make some calculations.
First, you should make measurements of all the walls, taking into account the location of the toilet, bathtub and washbasin. Then draw on a sheet of paper a plan of your bathroom, taking into account the scale. After that, you can choose a suitable tile in the store, pre-recording its size and direction of the pattern.
Then draw the location of the tiles on the plan.
It should be taken into account that sometimes the width and height of the tiles may not be a multiple of the size of the walls, so you have to cut the tiles.
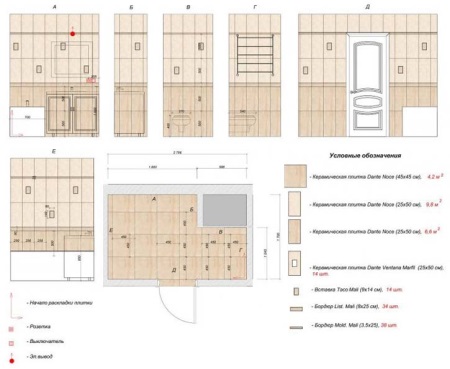
The whole tiles should be placed from top to bottom so that it is less noticeable. Draw rows of tile positions on the walls, taking into account the seams. Calculate how many tiles you need in pieces. Now you can safely buy tiles.
Don't forget that you need to take a little extra - about 10%, because some of the material may be damaged during the installation process.
Read more in our article About calculating the number of tiles.
We will also need tile glue. Some people use cement instead of glue, but it is not suitable for beginners, because it is very difficult to prepare such a solution, and it will be impossible to correct mistakes made in the process of laying. There are many brands and manufacturers of tile glue, but perhaps the best option is a mixture of CM11, which is in no way inferior to tile glue and also sold at a bargain price.
Read more in our article about choosing a tile adhesive.
Preparing the room
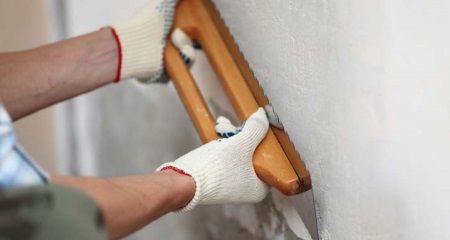
After purchasing the tiles, we will proceed to the preparation of the room. To begin with, shut off all water supply valves. All furniture and plumbing must be carefully dismantled and removed. You can get rid of the old tiles with a hammer or by hand, using a hammer and chisel.
In most cases, the old tiles are easily separated from the walls, so the dismantling will not take much time and will not require additional effort. Before starting work, you should wear protective goggles and a respirator to prevent small fragments from damaging the mucous membranes of the eyes, and the dust from entering the lungs.
Another important point is the curvature of the walls. A plumb line will help to determine the vertical deflection of the walls, the corners will check the angles. Flat walls are quite rare, so if the deviation is more than 5 cm, they will have to level.
To level the walls we will need: plastering beacons, plastering solution and a container for its preparation, a trowel, a punch or drill with a special attachment.
First, we fix the beacons. We apply glue, put the beacon and set it on the level. This is done one at a time. A ruler will help keep the beacons at the proper level. Then you should fill the space between them with special mortar. It is necessary to act carefully not to touch the beacons, periodically checking the level with a rule. When the mortar dries, start laying tiles.
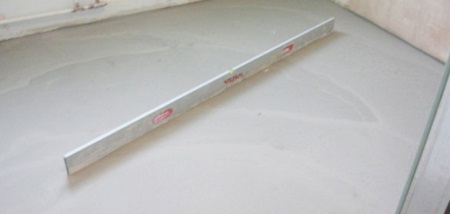
The floor should also be leveled before proceeding to the laying. To do this, again use screeds or a self-levelling liquid (mixture). Such a liquid will facilitate your task, but such a pleasure costs quite expensive.
So, first, let's check whether you need to level the floor or not.
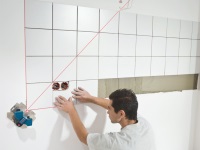
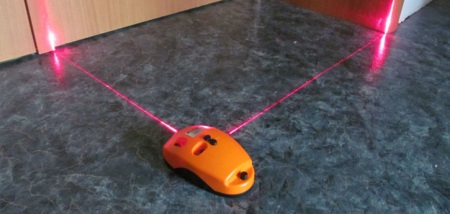
Professionals often use a laser level, but you can do it manually. First, draw a horizontal line from the highest corner in the room with a pencil, and then draw it all around the perimeter with a level. From the corners, draw diagonals to the center, using strings. The thread should not touch the floor and the distance from the floor to the highest point should not exceed 3 cm. If the thread reaches the floor, you should raise it a little and draw a line all around the perimeter of the bathroom again. This will be the level of the new floor. Next, we work according to the already known algorithm.
After leveling, we advise to cover the surface with a moisture-resistant primer, this will help a good adhesion of tiles with glue. It is undesirable to put pieces of tile in the corners and near doorways, it will not hold well. It is necessary to postpone all work for a couple of weeks after preparing the surface, so that the mortar dries well.

Tile laying technology
Finally we move on to the process of laying. Before diluting glue for tiles, you should carefully read the instructions. You do not need to prepare too much mortar, you may not have time to use it, and it will simply dry out. Since it is very difficult to stir the mortar well by hand, we will use a drill or punching machine.
Then you should draw an even horizontal line, from which the masonry will go.
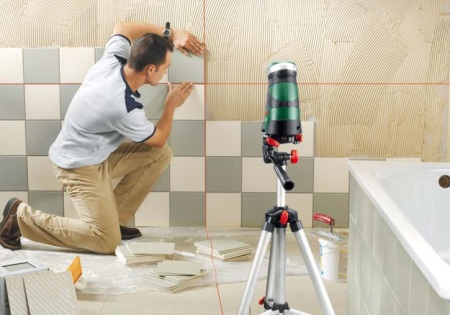
Important! It is best to start laying tiles over the bathroom.
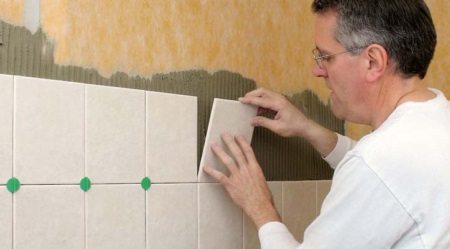
If you plan to lay tiles behind the bathtub, we will start from the second row. Special holding laths will help prevent the tiles from slipping. We apply glue with a trowel to the tile and put it on the wall. Slightly pressing, we check the level and correct mistakes if necessary. A rubber mallet will help you place the tile evenly without damaging it.
If the tile is too deep, you need to undermine it and repeat the process again. You may have used too little glue or pressed the tile hard. Special plastic crosses, installed at the joints of tiles, will help to maintain the distance and form a beautiful joint.
Cutting tiles
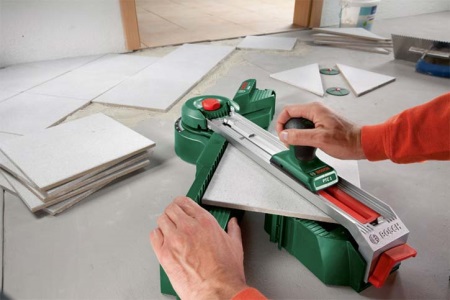
We have already talked about the fact that you can not lay out the bathroom with whole tiles, so they will have to cut. To do this, we will use a tile cutter (manual or automatic) or a grinder. For shaped cutouts, it is better to use pliers.
Work after laying
After finishing laying, you need to remove the remains of glue from the tiles, otherwise after drying you will have to grind the joints for a long time. It is desirable to give the tiles a couple of days to dry, and only then proceed to grouting. For this purpose, there is a special mixture, which comes in different colors (under the color of the tile). It is applied with a rubber spatula or brush. After complete drying, the tile should be washed with water and wiped with a dry cloth.
At this stage, the repair in the bathroom is over. If you have succeeded, we congratulate you! Now your bathroom will please not only you but also your guests.
Bathroom renovation at this stage does not end. Also read our article about, How to drill tile.


Tile laying requires experience. If you do not have it, it is better to trust the professionals.