Bathroom waterproofing
The bathroom is considered the most humid room in the apartment, which is why you should treat the repair with great responsibility and make waterproofing of the bathroom. In addition to the lengthy process of dismantling old materials, it is necessary to tidy up the walls and floor, which in most cases are far from even.
Over time, water can destroy a fairly durable material. A damp environment is an ideal breeding ground for bacteria and micro-organisms and as a result mould and unpleasant odours. Sometimes our indulgence can cost a huge amount of money spent on repairs of the neighbor's apartment due to water leakage. Even a small amount of water can seep through cracks and pores in the floor, and thus cause damage to the neighbors from below. That is why it is so important to waterproof the bathroom before you start laying tiles.
Waterproofing is a kind of process of preserving the floor and resembles a kind of tray with rims. Such a coating will collect moisture accumulating in the bathroom and will not allow it to penetrate deep into the bathroom.
Options
There are many waterproofing options, and choosing one or the other depends on many factors.
Two of the most popular methods of waterproofing:
- Waterproofing
- The coating method.
The first method involves the use of roll or film materials, which in turn are divided by the type of laying into self-adhesive and cladding.
Self-adhesive materials are easy to use and do not require special tools.
Heat-welded materials are mounted with a gas torch. You must carefully clean and level the surface, otherwise any unevenness can undermine your efforts.
When using a torch requires certain skills. Therefore, we recommend entrusting this part of the work to professionals.
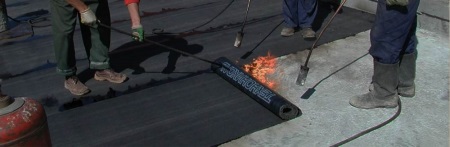
When the material overheats, in addition to a persistent unpleasant odor emits toxic substances that are extremely harmful to humans, which continue to be released in the room even after some time after repair, so think twice before deciding to use this method.
An argument in favor of paste-up materials is cheapness.
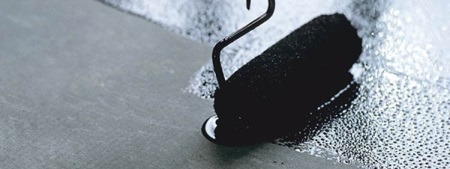
As for the coating materials, they are made on the basis of bitumen with the addition of solvent and latex or rubber. Such a mixture allows the surface to remain flexible, and as a consequence helps to avoid the negative effects of moisture. As a rule, coating materials are used in conjunction with a reinforcing fiber mesh. Fibre protects the surface from small cracks and makes the base more durable. Coating materials have many advantages, including ease of application and resistance to high temperatures. In addition, they have excellent adhesion, or in other words, adhesion.
Varieties of coating materials
Among the most common coating materials should be distinguished the following types:
- Bituminous mixture. It is made on the basis of petroleum bitumen with the addition of various fillers. Bitumen type of insulation is a fairly economical solution.
- Bitumen-polymer mixture (mastic). Such a mixture is popular among builders. It is based on latex and a solvent, which allows the surface to remain durable.
- Cement-polymer mixture. Universal mixture, which is used for waterproofing both walls and floors.
- Acrylic mixture. The latest development, which has a remarkable adhesion, and in addition has a neutral smell.
A distinction is made between cold and hot bituminous type of insulation. The first is not recommended when interacting with the acid-alkaline environment, which is concrete. The hot type of insulation involves laying bitumen heated to 160 degrees on the surface of the bathroom. Hot bitumen fills the space perfectly, providing reliable protection against moisture penetration. However, it is very difficult to heat the mixture in domestic conditions, so it is advised to refuse to use this type or turn to professionals.
Since bituminous materials are easily exposed to mechanical damage, they should be protected with a concrete screed.
Atlas Woder E technology
The most waterproofing needed in the bathroom is a 10 cm strip of wall around the connection to the floor and the area around the bath, washbasin and shower hose. The minimum height of waterproofing is 10 cm, but very often it is done up to the ceiling. That is why Atlas Woder E technology is often used.
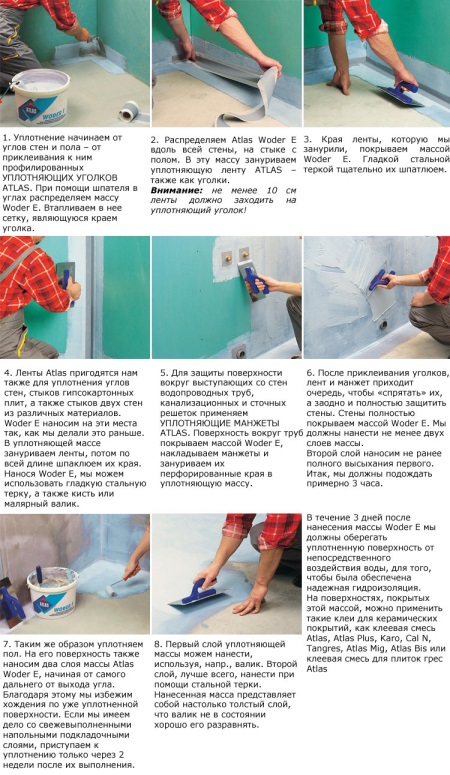
Preparatory work
Waterproofing in the bathroom involves preparatory work that should be done before the waterproofing itself:
- Thorough cleaning of the room from dust and debris.
- Check the strength of the concrete floor screed. You should thoroughly approach this process, because if you find cracks and voids, such a floor will definitely collapse during waterproofing. Therefore, if the old screed is not suitable for use, you should get rid of it. Plaster and concrete should be pre-moisturized with a sponge or sprayer, so that the waterproofing solution does not dry out before time. Then the surface is covered with primer and let it dry. After that we make a new screed. Knead up the mortar and distribute it over the surface, having previously established beacons on the surface at a height of 3-4 cm. We leave the floor to dry for 1-2 weeks.
- Applying primer. Primer or primer is applied in two layers. This improves adhesion to the surface to be insulated.
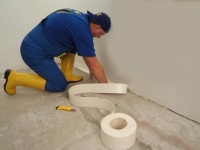
- Application of waterproofing materials on the joints. First, we coat the joints of the walls and floor with waterproofing mixture, and then apply water-repellent self-adhesive tape. To ensure that the tape is well adhered in the corners, it is advisable to use a small roller, passing it over the top.

Using roll materials
Rolled materials are self-adhesive waterproofing.
- First we measure out a piece of the required length and cut it off.
- Then remove the protective film and lay the piece on the floor. For reliable adhesion of the material to the surface it is recommended to additionally press it with a roller.
- The remaining sheets are laid with an overlap of 4-5 cm.
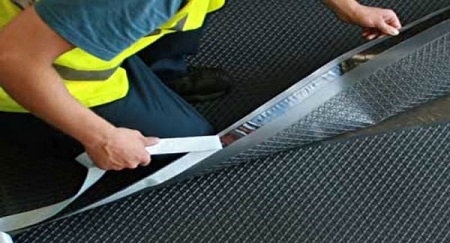
What is convenient about this technique is that you can start laying tiles immediately after laying roll materials. When using cladding materials, the roll is unwound under the influence of a gas burner and melted, glued to the surface. Rolled "protection" will last long enough, but sometimes steals extra centimeters due to the thickness of the material.
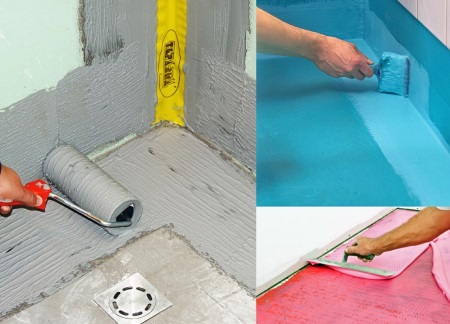
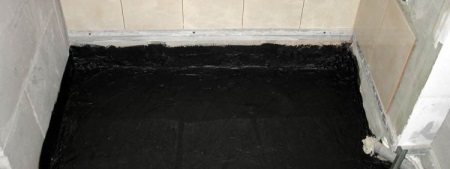
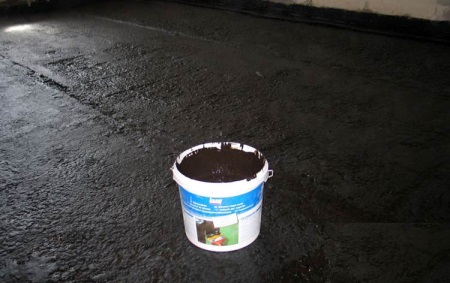
Using coating materials
- If the material in front of us in the form of a dry mixture, let's dilute it with water according to the instructions and stir it with a drill with a special nozzle until a homogeneous consistency is formed.
- First we apply the primer with a brush in 2 layers on the surface of the walls and floor. Then leave it for a couple of hours.
- Then on the floor and the lower part of the walls (skirting) we apply coating mixture in 2-3 layers. For liquid mixtures use a brush or roller, for thicker mixtures use a toothed trowel.
You can begin mounting the tiles not earlier than 24 hours later. This method is suitable even for beginners, but is characterized by a small service life (up to 5 years).
It is very important that the waterproofing layers were a single unit, so the entire material must be applied in one approach, without long time gaps.
Waterproofing of a wooden floor
Here we should take into account the fact that wood, unlike concrete, is highly permeable to moisture, which poses a certain problem. Despite this, the process of waterproofing a wooden floor is not much different from the waterproofing process with coatings.
First, the base is applied, then the mastic is applied in 2-3 layers, and then you can move on to the decorative part.
Builders recommend using polyurethane paste as the base material. Also on sale is a special wood treated with water-repellent agents.
Tips
Finally, I would like to give you a few simple tips:
- Before you buy the necessary materials, make measurements of the floor. The label of the material usually indicates the area for which the container is designed.
- Particular attention should be paid to waterproofing the tub. Additional protection can be achieved by coating the joints of the tile and bath with silicone sealant.
- To avoid water leaks will help to install a "smart" system with an alarm system that reacts to the slightest leak and automatically shut off the water in the apartment.
- Pipes should also be treated with mastic.
- The floor level in the bathroom should be below the floor level in the adjacent rooms.
Waterproofing in the bathroom is a long and labor-intensive process, but the result and peace of mind is worth the effort.


I did the waterproofing with the coating materials. It was quick, no hassle. I didn't know the life span was so short with this method. Got a little frustrated.