Tile alignment system
Especially to facilitate and accelerate the process of finishing the interior of apartments, houses and offices with tiles, experts in the construction industry are developing various versions of the so-called tile alignment systems. In fact, this is a set of special devices, consisting of both disposable consumables and elements designed for repeated use, which allows you to cope with the task of proper arrangement of premises where it is planned to use tiles.
The peculiarity of modern tile-smoothing systems is that they are quite simple to use, which makes them a real boon for the non-professionals who do not want to overpay for the services of a team of tilers and decide to make repairs in the apartment by their own efforts.
The peculiarities of laying tiles in the bathroom
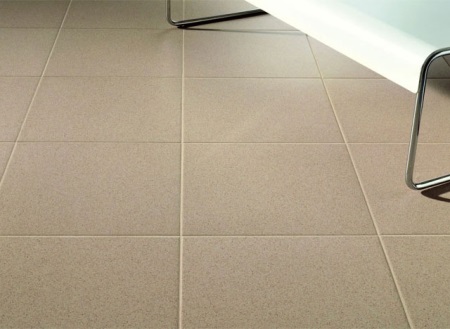
Laying tiles in the bathroom only at first glance seems to be a simpler matter than in other rooms and rooms. In the case of the bathroom, its relatively small size is more of a circumstance that complicates the task of the tiler, rather than a plus. Judge for yourself - in a compact enclosed space is much more noticeable all the flaws and imperfectly matched squares of tiles immediately catch the eye.
You should also understand that the tiles on the floor will go into vertical rows on the walls of the bathroom, which makes even minor irregularities in the laying unacceptable. Add to this the extreme humidity and high temperatures that the tiles will have to endure on a daily basis - and it becomes clear that without a perfect calculation, a steady hand and a professional approach, the tiles in the bathroom will not be put correctly.

As mentioned above, in the case of laying tiles in the bathroom approach "by eye" is unacceptable - the differences in height between different tiles and uneven gaps between them can lead to moisture penetration under the tiles. And this is fraught with various undesirable consequences - from the appearance of mold to flooding the neighbors who live on the floor below. When using a tile leveling system in full accordance with the simple instructions, the bathroom will be insured by default against all these and any other troubles associated with improperly laid tiles. Actually, the main purpose of tile leveling systems is to ensure a perfectly even horizontal (or vertical - in the case we are talking about the walls of the room) surface without height differences and neat equal gaps between tiles.
Tile levelling methods before the advent of HPS on the market
Before the advent of modern tile alignment systems, builders used plastic crosses, which acted as guides when laying individual elements. It is worth noting that these devices coped with the task of ensuring the uniformity of joint gaps with some success. However, they could not affect the fact that the neighboring tiles could "walk" on the level.
Partly remedy the situation experts of the old school tried with the help of a string stretched parallel to the floor on the upper border of the installed tiles. However, the unevenness of the floor and the inevitable shrinkage of the tile adhesive, on which the elements were placed, essentially negated all these efforts. The current technology, which is becoming more and more widespread and accepted, solves both of these problems.
How the tile leveling system works
The success of the work on laying tiles with the help of UTP (in this case, this abbreviation refers to the development of any manufacturer, not the brand of the same name that sells such goods) depends on the clear adherence to the instructions.
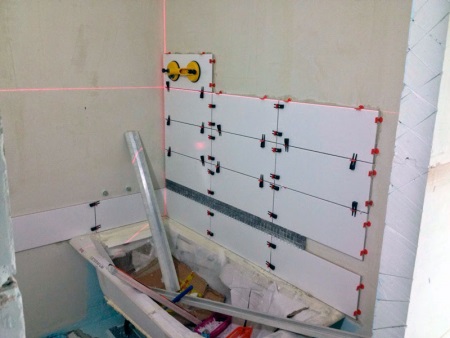
The starting step is absolutely standard and includes the preparation of the tile adhesive solution. It is important to stir and apply the adhesive exactly as indicated on the package with the mixture. The consistency of the adhesive mass should not be too liquid or thick. Next, it is necessary to lay the first tile exactly so that all subsequent segments go in the desired direction. Particular attention should be paid to the horizontal alignment of the first tile (and in the case of laying tiles on the wall - vertical), because it is from the correct level of the starting square depends on the level of the entire final surface of the tile.
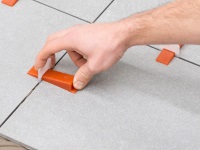
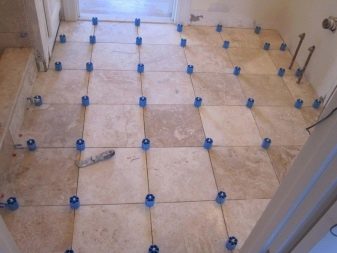
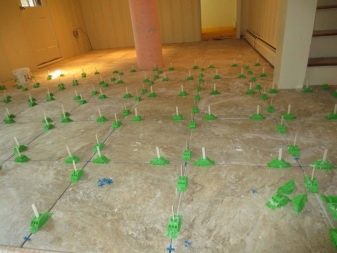
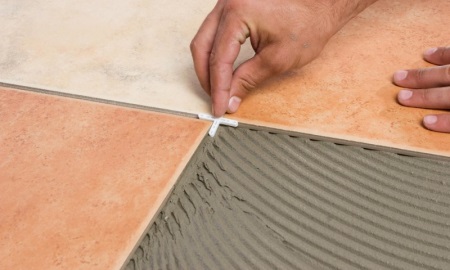
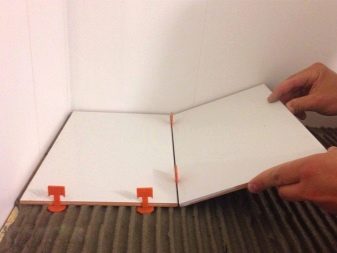
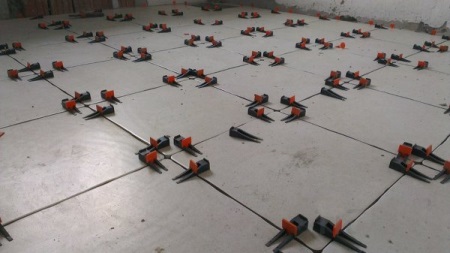
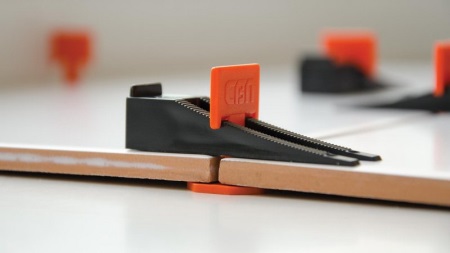
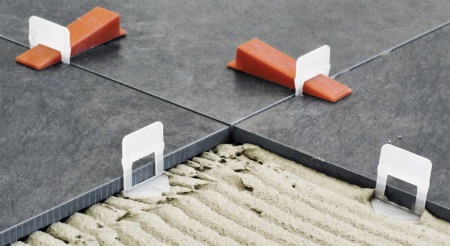
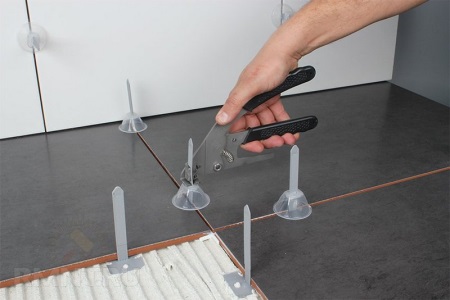
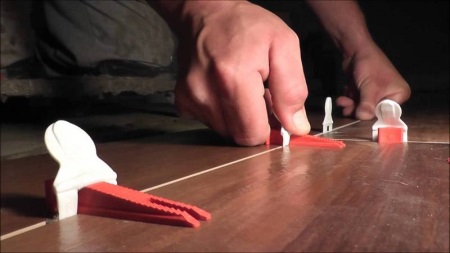
After the first tile has been perfectly positioned, one or two - depending on the features of the particular system - single-use clamps are installed on each side of the tile with the indentation provided in the instructions from the edge of the tile. At this stage, the developers of some tile alignment systems provide for the use of plastic crosses for a more accurate "joining" of adjacent elements and obtaining perfect gaps and joints. After all the preparatory steps, the next square of tiles is laid. After making sure that the lines formed by the edges of the adjacent tiles are straight, without tilts or "setbacks," the craftsman inserts special wedges into the clamps that are placed between the tiles. The purpose of this action is to achieve a tight fit of the "sole" of the wedge to the outer surface of the two adjacent tiles. Once this goal is achieved, we can say that there are no level differences between the tiles.
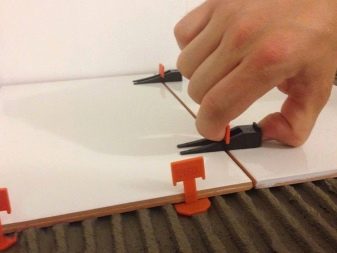
Next, it is necessary to repeat all the steps the required number of times, until the adhesive hardens. The advantage of tile alignment system is that its use allows you to speed up the process of tile laying several times, even if the work is done by an amateur, rather than a whole team of professionals. And the consequence of the fulfillment of all the stages of tile alignment with a system like this is that the tiles fixed with clamps and wedges won't "go" during the drying adhesive shrinkage.
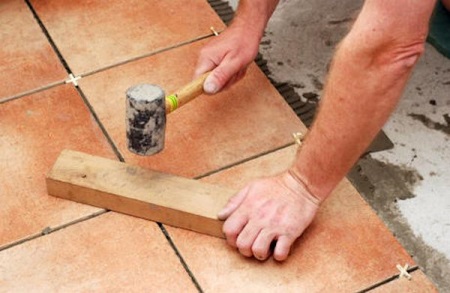
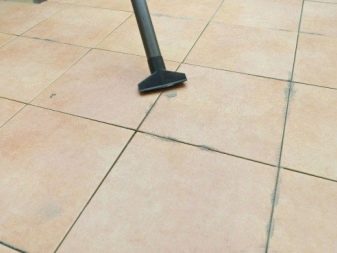
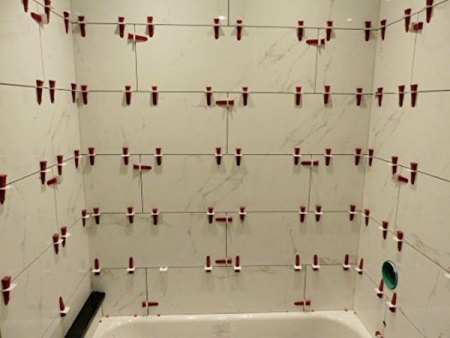
Once the adhesive is completely dry, and all the tiles laid are firmly glued to the floor, the next step is removing wedges and clamp parts sticking out of the gaps, which is a favorite of many who have already used tile alignment systems. This is done with the help of a rubber mallet, or in the soccer style - by carefully striking the "stem" of the clamp with your foot. The whole point is that the lower part of the clamp stays under the tile, and its upper part is easily separated along the line, where the factory method is a cut or perforation.
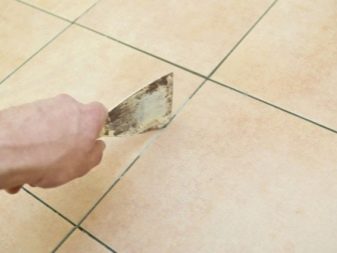
After removing all protruding elements of the system, it is also necessary to remove any glue residues from the gaps. After that, these joints are treated with a special grout, which is a dry mixture that is diluted with water and applied to the joints obtained in the course of laying. To give these gaps an aesthetic appearance, the grout is applied and handled with a special grouting trowel.
Comparison of tile leveling systems from different manufacturers
At the moment on the market there is a wide enough choice of hWS as of Russian production, as well as produced by companies from near and far abroad.
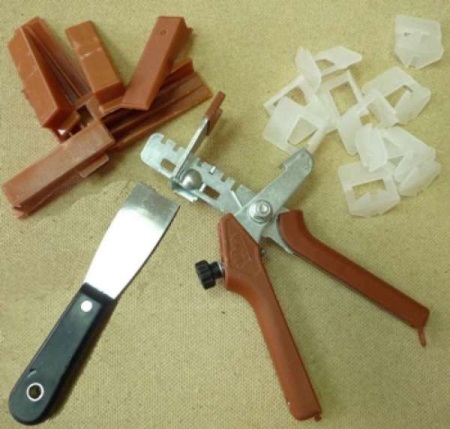
Among the domestic developments there are tile leveling systems under the trademarks SVP and DLS. The first abbreviation, actually, is deciphered as "tile leveling system". The name of the second ("DLS") means "daz levelling system". There are fundamental differences between the two systems. For example, the creators of "SVP" suggest using two clips on each edge of the tile, and also advise installing plastic crosses on the edges of the tiles in some cases.
At the same time, according to the manufacturer of DLS, their system allows you to limit yourself to four clamps instead of four and completely abandon the plastic guides on the edges of the tiles. Besides disposable clamps and plastic wedges, the DLS set includes a special device resembling a clamp-feeder. With its help alignment of not two but four neighboring tiles is provided.
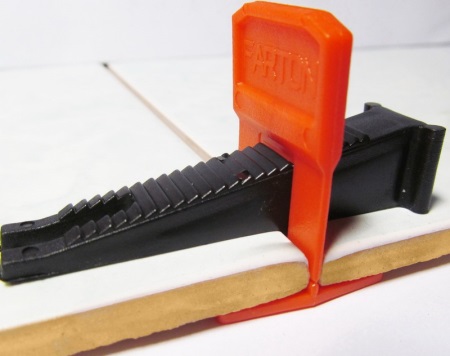
Also a separate mention should be given to a development of the Belarusian company "Farton". Their tile alignment system, called Farton, in many ways resembles the technology used in the Russian "SVP". In this case, the creators position Farton as a system of laying and aligning not only tiles, but also porcelain tiles with a thickness of 6 millimeters to 1.4 centimeters.
In the Western market, you can find both analogues of the above systems, as well as fundamentally different proposals for the design of the clips. So, instead of wedges special nozzles, reminiscent of the shape of a hemisphere, are used in some HSS. After the tile adhesive dries, they are supposed to be removed with special tongs.
Consumer reviews
On the websites of manufacturers of various modifications of tile leveling systems, as well as on specialized forums dedicated to repair and construction, there are regularly messages and comments from those who have had time to evaluate this or that HPS.
Professional finishers note that the functionality of such systems is very useful when laying large size tiles. At the same time, experts give credit to the fact that even with conventional dimensions, the use of a tile alignment system can significantly speed up the process and save time.
The feedback from ordinary users can be divided into two roughly equal parts. Some of those who made repairs with their own hands appreciated the hovercraft, recognizing its usefulness for tasks that require special skills and experience. Others complained that the simplicity of the idea and design of such a system, in principle, allows you not to spend money on it and make an analogue of wedges and clamps yourself.
Homemade tile alignment system
Artisans in the Network share ways of homemade tile alignment system. Consider the most, judging by the number of reviews and lively discussion, popular of them.
As the material for the clips it is suggested to use an ordinary 1.7 mm aluminum wire. Rectangles of 1.5 centimeters high and 0.9 centimeters long are made of it. The upper edge, which will protrude over the tile, is formed by folding the two ends of the wire. To easily remove the upper part of the clip after the glue dries, bite the wire in the right places with wire cutters.
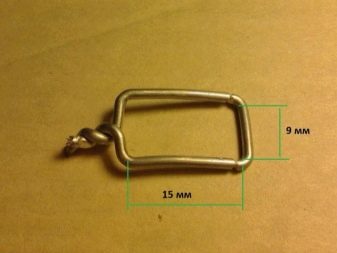
To make a base for the clamp, which will ensure its secure fixation in the layer of glue under the tile, it is suggested to take a small scrap of mounting tape, a flat metal plate or a piece of thin profile. The role of the wedge in this design will be a regular plastic wedge from the tiles, reinforced with a piece of fiberboard. Being driven under the twisted wire up to the stop, such an improvised wedge will provide a level unification of two neighboring elements of tiling on the same principle that is used in the factory systems of aligning the tiles.

Learn more about the tile alignment system in the following video.


