Electric under tile floor heating

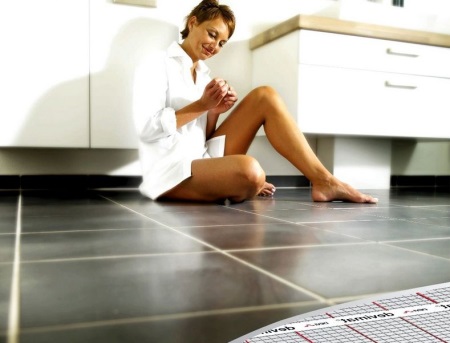
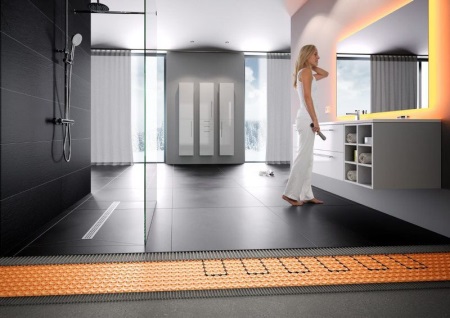
Thinking over the design of the bathroom, you should take into account that even the most beautiful tiles on the floor are unlikely to cause a desire to admire it if you will feel uncomfortable stepping on it, especially coming out of the bath or shower stall. The reasons for this discomfort can be two: a slippery surface and low temperature. If the first reason is easy to get rid of at the design stage, initially choosing tiles with non-slip, rough surface, the problem of thermal discomfort can be solved in several ways, including the laying of a warm floor.


In the latter case, you will not only be pleasant to step on the warm floor, heating of the entire bathroom, in terms of heat transfer, will become more even than with the operation of the classic heating equipment, fixed to the wall, as warm air will rise evenly from the bottom up.
Pros and cons
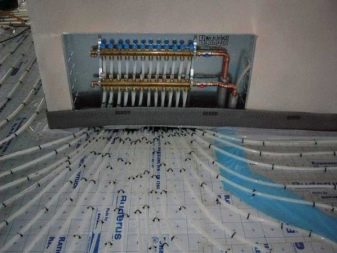
Underfloor heating in the bathroom can be provided in several ways:
- water;
- electrical.
The advantages of water underfloor heating include low energy costs in operation, but there are too many disadvantages to ignore:
- high complexity of installation with the connection of the water circuit to the heating systems and, consequently, the high cost of installation work;
- quite a large lifting of the floor due to the massive screed and the pipes themselves;
- the possibility of operation only in the heating season;
- the risk of leaking water pipes and, consequently, the likelihood of flooding of the lower floors of the apartment building;
- additional load on the floor, which is especially important for multi-storey buildings;
- coordination with the utilities.
With the electric floor the situation is the opposite. The disadvantages are probably only the additional cost of electricity, which, however, can be corrected by choosing the best option for your bathroom underfloor heating.
The advantages are much more weighty:
- comparative ease of installation;
- The technological process of laying an electric floor requires a minimum of screed in the bathroom, and in some cases you can do without it, which significantly reduces the cost of installation work;
- operation is possible at any time, and for some types of electric floor heating is available self-regulation;
- there is no risk of leakage of the heating medium;
- No need for any approval procedures.
Types
There are several options for the electric type of underfloor heating:
Implemented on a heating cable:
- single-core;
- double-core;
- semiconductor self-regulating.

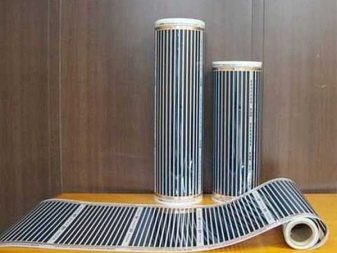
Infrared:
- rod;
- film.

Which is the best choice?
The advantages of single-core and double-core cable electric floor include a relatively low cost of both consumables and installation work for its installation.
Of the disadvantages can be noted:
- uniform and simultaneous heating of the cable length, which is not always convenient, since the possibility of self-regulation of temperature is not implemented;
- circuit breakage entails the termination of the entire system;
- exclusion of placing the heating cable under the stationary objects of furniture and large household appliances, located in the bathroom to avoid overheating and failure of the entire system.
These disadvantages are deprived of the option of using a semiconductor matrix, but the cost of this innovative development is much higher.
Among the advantages of the rod infrared underfloor heating are:
- self-regulation of heating;
- the possibility of placing it in the bathroom, as in a room with high humidity;
- environmental friendliness.
Perhaps the only significant disadvantage of this type of floor heating is its high price and frequent fakes.
The film floor heating is more suitable for laying under the laminate or even under the floor covering and it is better not to use it in the bathroom.
Design
The design of electric underfloor heating can be different depending on its type:
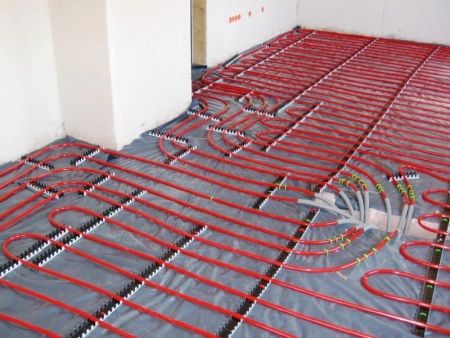
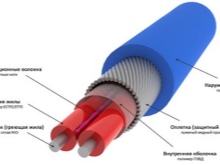
- The operation of single-core cable Is based on the resistive principle. The peculiarity of using a cable of this type is the need to bring both mounting ends in the place where the thermoregulator will be installed.
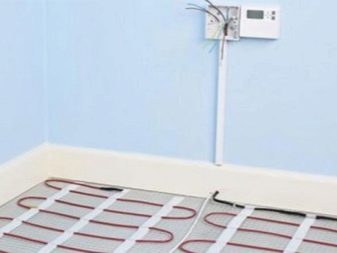
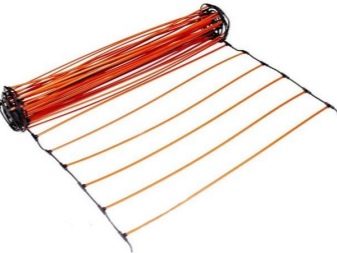
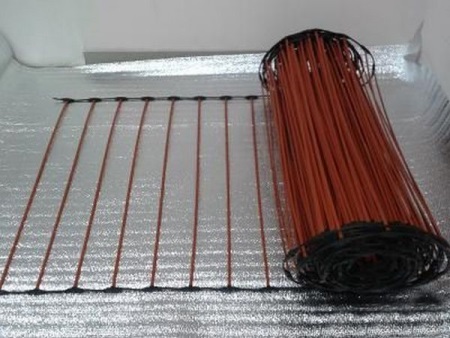
- When using a two-core cable the circuit is closed by means of an end sleeve. To facilitate laying work, heating mats are used, which are two-core cables laid at a calculated pitch and fixed to a fiberglass mesh, as well as a variant in which the same cable is fixed to tapes made of elastic mesh.
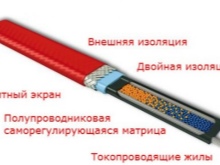
- Heating in a semiconductor cable occurs in a matrix, which is located between the two metal wires. A distinctive feature of this device is the self-regulating system provided by the fact that the conductivity of the semiconductor depends on the temperature.
- The operation of the infrared carrier is based on using the properties of heating rods: when an electric current is passed through them, they release thermal energy, becoming sources of infrared radiation. Important features of this type of floor heating are the independence of the heating elements from each other, which ensures the continued functioning of the entire system, even if one of them fails, and the property of self-regulation, which guarantees the absence of overheating.
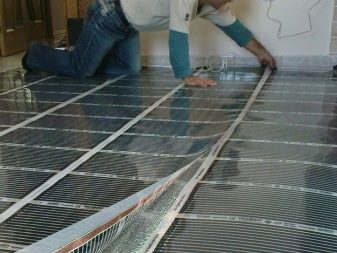
- Infrared film heating sets work on the same principle, but are placed on a film substrate.


Preparing for installation
If you invite professionals to install a warm floor, all you need to do is to agree on the cost and monitor the performance of the work. If you decide to make a warm floor in the bathroom yourself, it seems logical to initially make a detailed plan of laying technology and follow it exactly to avoid later difficult, in all senses, remodeling.

Such a plan includes the following steps:
Preparation of tools for installation work:
- wire cutters for removing insulation and cutting wires;
- soldering iron, solder and flux for switching wires with a thermal controller;
- a construction hair dryer for heat shrinking operations;
- a screwdriver or a rotary hammer for drilling and tapping
- a drill with tools;
- electrical equipment - a multimeter to measure the total conductivity of the entire circuit and a megohmmeter to measure the insulation resistance;
- containers for mortar and primer;
- trowels of different kinds;
- a rule;
- a roller or brush for priming the floor;
- level;
- tools for marking (tape measure, ruler, marker).
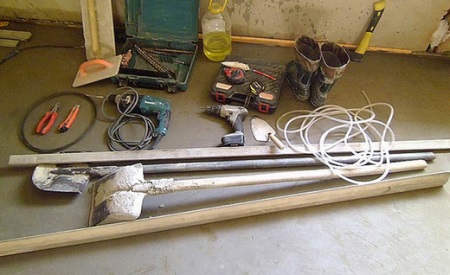
The above list of tools is given for the full cycle of preliminary work. If some types of work will not be necessary, you will not need the appropriate tools.
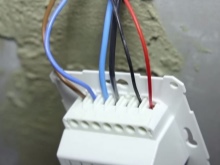
- Purchase of the thermostat with a temperature sensor - taking into account the design and color design, suitable specifically for your bathroom.
- Preparing the floor for installation work - the floor must be prepared for installation, as any irregularities and gaps in the floor can cause improper operation of the floor heating and its failure.
- Insulation of the base surface - before proceeding directly to the installation work, it is necessary to lay a foil thermal insulator on the floor, which will ensure a reduction in energy costs, especially if you live in a private house or on the first floor, where under your bathroom there is an unheated room.
- Connecting the power line with grounding and installing a circuit breaker at the switchboard - for such work it is better to use the services of a professional electrician.
- Strobing the wall and floor for laying "cold" wire.
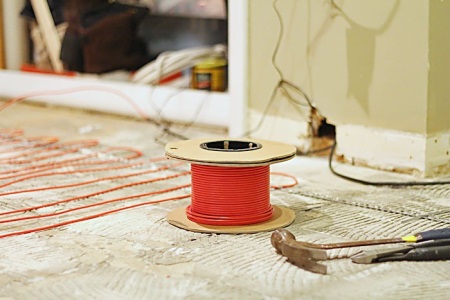
- Calculation of the necessary length of cable (if you opted for the cable version), the size of infrared sets or film elements.
In this case, it seems reasonable to make a scheme that regulates the installation of thermostat, power connection and layout of heating elements.
The following key points must be taken into account:
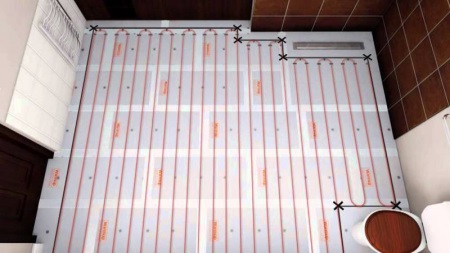
- distance from the walls must be equal or more than 50 mm;
- the distance from the heating systems must be equal or 100 mm;
- it is not allowed to cross the cable;
- it is not allowed to install a cable electric heating floor under the furniture and large household appliances (does not apply to infrared and film versions of the floor heating).
In order to properly make a scheme, in accordance with which the heating cable will be laid out, you should know its required length and the pitch between its coils, which can be calculated in two ways:
Manually, using the formula L=S×Qs/Qkbwhere
- S - the planned paving area,
- Qs - amount of heat energy,
- Qcb - length of the heating cable.
The value of this value is chosen depending on the functional purpose of the floor:
1. The floor is the only source of heating:
- underneath there is an unheated room - 180 W/m²;
- underneath there is a heated room - 150 W/m².
2. Floor - additional source of heating:
- underneath there is an unheated room - 130 W/m²;
- underneath there is a heated room - 110 W/m².
- kb - specific heat power of the heating cable (cable passport);
Then the cable pitch is calculated according to the formula N=100×S/L
- Using the calculator which can be found on various Internet sites dedicated to do-it-yourself bathroom floor heating by indicating the requested parameters: the calculated area, the functional purpose, the specific heat power of the selected model of floor heating and the length of the selected set. The last parameter is necessary because the cable does not come in arbitrary lengths, but in several standard versions, so in some cases you may need several such sets, each of which will be laid independently of each other.
- Drawing a diagram of laying the heating cable on a real scale.
Installation
Depending on the chosen type of electric floor heating (cable, rod infrared or film), the installation process may have different steps.
Cable
- Checking the availability of everything necessary for installation: tools, mixtures for screed and primer floor surface, thermostat, temperature sensor, all the components included in the set of "floor heating".
- Installation of a socket for the future socket for the subsequent installation of the thermostat (at least 30 cm high).
- Stitching (section 2x2 cm) of the wall in a vertical direction to the level of the floor with a hole punch or a grinder with a disk to work on the stone.
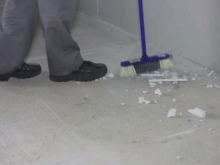
- Cleaning the floor.
- Treatment of the floor with primer.
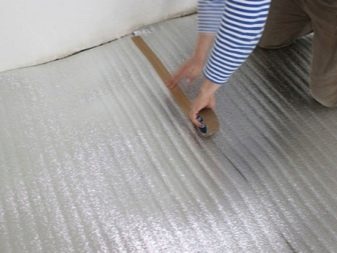
- Laying of back-to-back sheets of insulation with a foil layer upwards with a slight (a few centimeters) overlap on the walls by connecting them with a foil tape. As an insulator you can choose between foamed polystyrene, foamed polystyrene, polypropylene, etc. When choosing it, you should take into account that some types of insulation have a fairly high thickness, therefore, it will still reduce the height of the room.
- Fixing around the perimeter of the room damping tape to compensate for the expansion of the coating when it heats up.
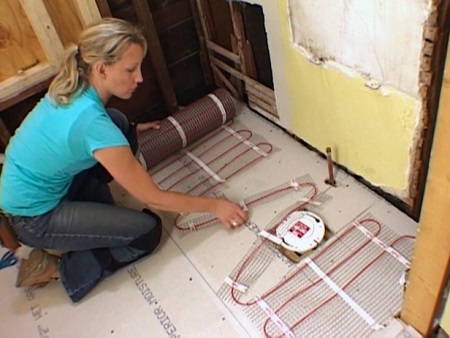
- Installing the thermostat in the already prepared sub-socket.
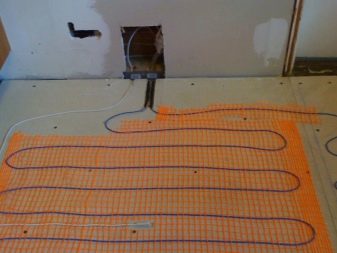
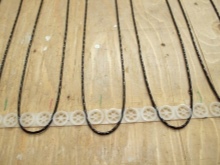
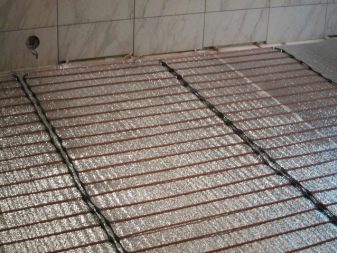
- Laying and fixing (with plugs, self-tapping screws or fiberglass reinforcement mesh) mounting tapes, the distance between which is allowed from 50 cm to 1 m.
- Fix the heating cable in the area of the connection sleeve, placing the "cold" end of the cable along the wall, making sure it is long enough to be connected to the thermostat at a later date.
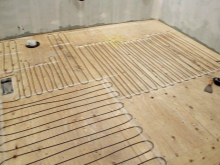
- Arrange the heating cable in accordance with the pre-designed layout. It is important not to allow the cables to overlap or cross each other.
- Mounting the temperature sensor. For protection against external influences, the temperature sensor is placed in a corrugated tube, which is included in the set of floor heating, the end of which is closed with a plug, which is also included in the set. Then the corrugated tube is placed and fixed by means of adhesive in the groove, and the remote part of the temperature sensor must be located at a distance of 40 cm from the wall.
- Laying in the hole also power supply wires with fixing them into a single bundle with subsequent sealing of the hole with a cement-sand mixture or tile adhesive mortar.
- Check electrical parameters: circuit conductivity and resistance, insulation resistance of heating cable for compliance with the passport data. If you do not have the necessary skills, it is recommended to use the help of a professional electrician at this stage of installation work.
- Supply 220 V electrical voltage to the heating cable and the temperature sensor to verify proper operation of the entire system. In case of a positive result, the power is disconnected until the full completion of the repair work in the bathroom.
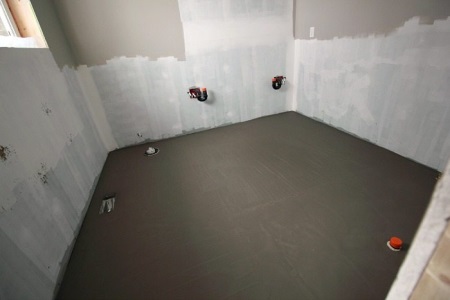
- Ensuring the best contact of the future screed with the surface of the floor, for which in the insulation in staggered order at a distance of 10 cm from each other are cut rectangular holes 5x15x20 cm.
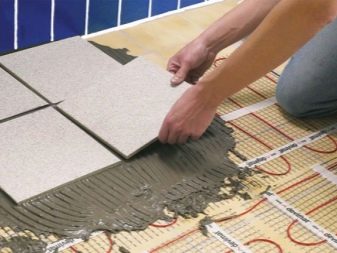
- Floor leveling (screed).
- Screed drying within a week.
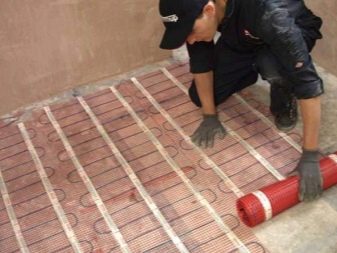
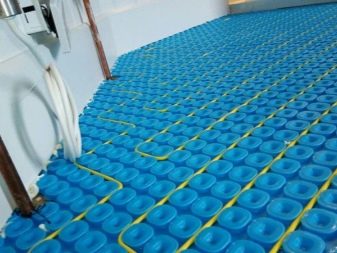
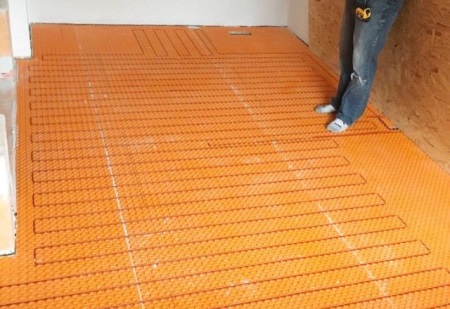
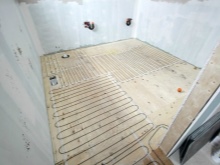
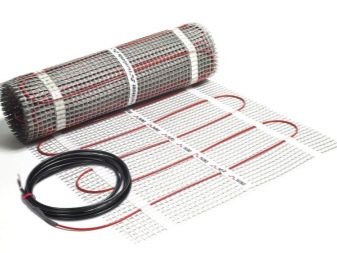
Mesh mats
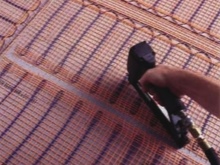
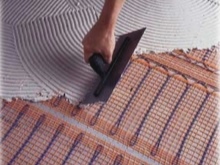
Recently, the so-called mesh mats, which are a fiberglass mesh on which the wire is already laid in compliance with the allowable step between the parallel cable loops, have become increasingly popular both among professionals and among those who are going to provide themselves with a warm floor in the bathroom independently.
Technological process of laying on the base surface in the bathroom of the mesh mats is basically the same as the installation of double core heating cable, except for a few moments:
- In this case it is necessary to have, in addition to the vertical hole, also horizontal (of the same cross section with a length of about 60 cm from the wall) for laying the corrugated tube with the temperature sensor. It is important when installing not to break the corrugated tube at the transition from the horizontal to the vertical hole.
- Laying of the mats is also performed in strict accordance with the pre-calculated scheme, but not from an arbitrary place, but so that the temperature sensor is in the center of the cable coil.
- When arranging the mats, it is required to keep a distance of at least 5 cm between the strips with the cable.
- If it is necessary to change the laying direction, cut the fiberglass mesh with scissors (without touching the cable) and unroll the piece in the desired direction.
- The mesh mats are fixed on the base surface using a special glue (with a thermal gun or by hand).

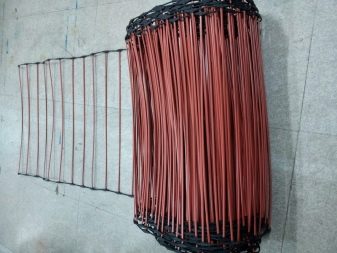
Infrared rod mats
The important thing is to observe the condition: the total length of the mats must not exceed 25 m. All the basic steps of the technological process correspond to the previous variants.
The only difference appears when laying directly with infrared rods:
1. The installation should start from where the temperature sensor is located, with its head in the center between the adjacent infrared rods. When laying the mats, at least 10 cm from the walls must be observed.
2. When changing the laying direction it is necessary to cut (with wire cutters or scissors) the conductive wire farthest from the pivot point, so that the cut is in the center between the rods.
3. The mats can be secured with duct tape, strips of which are placed both along and across the entire surface.
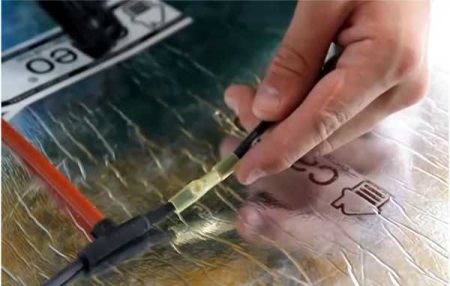
4. Connecting the ends of the conductor rail with the cable is done as follows:
- The insulation is stripped from the end of the conductive cable, and a connection sleeve is put on it and crimped at one end;
- the loose end of the connection sleeve is inserted into the end of the patch cable with the insulation stripped, on which the heat shrink tube is first put and temporarily shifted aside; the sleeve is crimped again;
- the resulting connection is closed with a heat shrink tube and warmed up well, e.g. with a hairdryer;
- this is repeated for the second connection;
- To the other ends of the conductive cable, the end sleeves are installed (heat-shrink tubes are put on, crimped and heated).
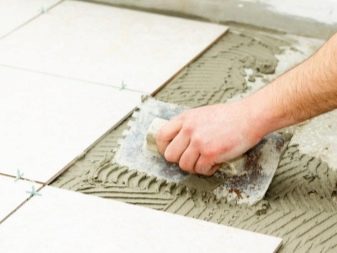
Tile installation
Tiles, glazed or porcelain tiles, are laid over the screed after about a week after it has been poured and thoroughly primed. The technological process of laying tiles in this case includes all the usual steps, the only difference is the use of special glue that is not subject to destruction when working in conditions of temperature fluctuations. In the case of choosing mesh sets, it is allowed to do without screed, laying the adhesive composition and tiles directly on top of the mats.
How much does it cost
The price of electric floor heating, and hence the comfort of your feet, depends on the type of electric heater selected, its power, the preferred options for thermostat and thermostat, the manufacturer of components, consumables, as well as the cost of preparatory and installation work, which, however, it is possible to carry out by your own forces.
The least expensive option is an electric floor heating, made of a single-core heating cable, the cost of which starts at 3000 rubles per 5 square meters. Heating mats made of such cable is more expensive - from 4500 rubles per 5 sq.m.

One of the most popular types is considered a floor heating with a double core heating cable, the price of which is in the range of 3000-5000 rubles per 5 sq.m. The cost of more convenient to install mats of such a heater on a fiberglass mesh starts from 7500 rubles per 5 sq.m.

The most expensive of the cable types of electric flooring today is an electric semiconductor self-regulating heater, the price of which starts from 1400 rubles for 1 n/m.
The price of the infrared rod floor is calculated based on its capacity and area, and starts at 2900 per sq.m.
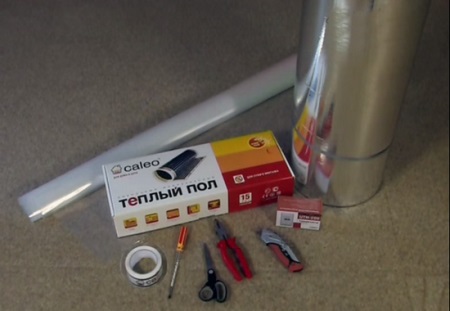
The cost of infrared film floor depends on the width of the film and ranges from 300 to 600 rubles per 1 n/m.
Reviews
Among those who have already installed a warm electric floor in the bathroom, there are almost no negative reviews, and those that do appear, mainly due to non-compliance with the technology of laying such a heater, and as a consequence, expensive repair work.
Of course, electric floor heating teaches you to control the consumption of electricity, but the incomparable feeling of comfort when you get out of the bath or when bathing children is worth it, especially in summer and during the off-season, when other sources of heating are cut off.