The shower tray with their own hands: instructions

The alternative to the purchased shower trays are trays made by your own hands, as even a layman is quite able to make their own efforts and produce the tray. This will save money, and at the same time allow you to show your imagination and creativity.

Choosing the height, shape and size
At the stage of planning a renovation in the bathroom you decided to install a shower tray or a shower cabin? You have several ways to implement this idea. Buy a ready-made shower enclosure, buy a ready-made shower tray or make a shower enclosure with your own hands.
The advantages of self-made can include the following arguments:
- significant cost savings;
- the ability to make a tray of any shape and size;
- to choose a decorative coating, in accordance with the design of the room;
- install exactly the shower equipment you need;
- choose or order an individual fence.
As a result, you will have an exclusive shower cabin in which quality you will be absolutely sure. In this article we will tell you how to competently build a shower tray, what materials and tools you will need, and help you avoid mistakes in construction and finishing.
Choose a place for the construction of the shower tray. It is desirable to place it near the communications, but this question is not crucial, with a competent wiring of communications, you can make the tray in any place in the bathroom. Pay special attention to the screed and waterproofing of the floor in the room:
- For a city apartment, a light screed, and lightweight construction of the tray will be best.
- In a private house or cottage, the weight of the construction is important only when organizing a bathroom on the upper floors of the house. In this case, it is necessary to calculate the allowable load on the floor.

Choose the form of the tray. Here it all depends on your imagination, experience in construction and the size of the room. Not unimportant is the convenience of the future pallet for all family members. For example, if you have obese or elderly people, the size of the tray should be large and preferably have a streamlined shape. The absence of sharp corners will guarantee safety.
Choose the height of the sides of the tray. The choice of options for the height of the tray is huge, you can do without a board, buying a special ladder or build a mini-pool. However, these options are mainly available only to owners of private homes, since the installation of shower traps "in the floor" requires raising the overall floor level and a larger layer of screed. A mini-pool is a very heavy structure, and when fully filled with water, it can lead to the collapse of supporting structures or ceilings.
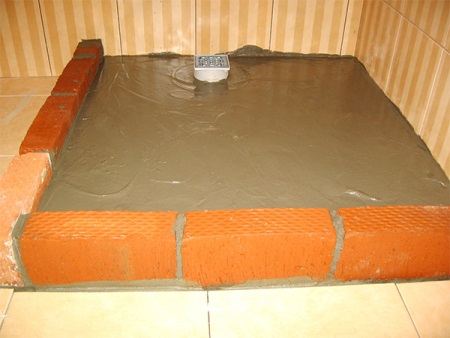
The standard height of the shower tray can be considered the height of one brick from the inner surface of the tray.

Preparatory work
When the plan of the future construction is ready and all calculations are made, it is worth purchasing all the necessary materials, these can be:
- trap;
- bricks;
- cement mortar and sand;
- waterproofing mastic or other materials of similar purpose;
- waterproofing film or roofing felt;
- Finishing materials and glue or mortar for laying decorative coatings.
You will also need the following tools and fasteners:
- A roller or brush;
- marker;
- punch;
- screwdrivers;
- trowel;
- Construction level, screeds;
- self-tapping screws, dowels, plugs and gaskets.
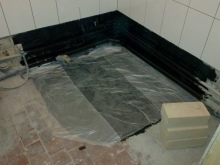
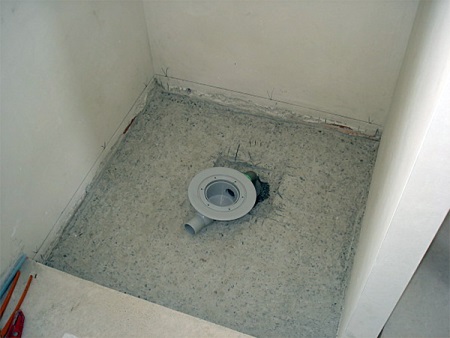
The first stage - Is the preparation of the base, which will be built on a pallet. Clean the surface of the floor and adjacent walls. If the floor has no initial concrete screed, then make it. Priming the base. This is done necessarily in order to waterproof your future structure, and in order to prevent the formation of fungus and bacteria in operation. If there is a desire to make the pallet even more comfortable, then under the subfloor you can lay a system of "warm floor".


The second step: Connect the pipes at a slope of the drain to the drain, fix it firmly. The angle of inclination of the drain must be at least three degrees.
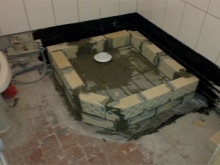
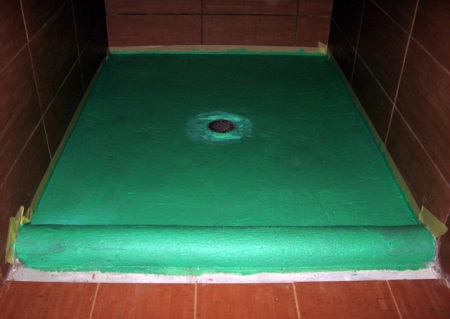
The third step - We pour a cement-sand mixture or lay out the base and sides from bricks, taking into account the height of the drain and the slope to it. Next, very carefully seal the entire structure. The tray is ready for finishing.
Making
The tray can be made of cement or use prefabricated concrete blocks or bricks. It is better to buy bricks not silicate, but ceramic, as this type of brick is resistant to water.
For a wooden floor, it will be correct to make a concrete screed and lay a trap on it, and then already raise the pallet to the level of the trap. In this case it will be necessary to make a formwork and wait a few weeks until the concrete hardens completely. Never use cement-lime compositions for leveling surfaces. It is necessary to take only clean cement and sand.
Peculiarities of installation of the drain
A sewage drain is a system of drainage from the tray. Usually for bathrooms choose plastic models. They are lightweight, easy to install, easy to clean, and they are also resistant to aggressive household chemicals.
Modern models are equipped with a siphon, which prevents the penetration of unpleasant odors from the sewer into the room.
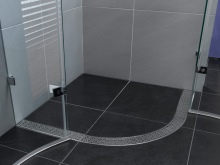
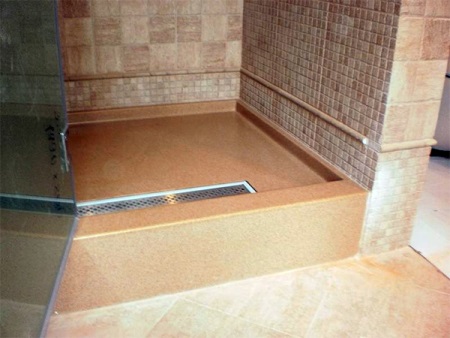
Drainage hole of the drain can be located in the corner of the tray, and can be in the middle of the construction. Keep in mind that it is much easier to make a proper slope to the drain, placed in the corner.
If you do decide to install the drain in the center of the sump, properly organize the level of water drainage to it. There are solutions that allow you to embed the drain into the wall instead of the floor, which is the latest trend, but requires a lot of effort and knowledge of installation technology.


The drains are available in various shapes: square or shaped, round or oval as well as triangular. They can be equipped with various grids, sealing gaskets, with different diameters of trap and drain pipes. There are whole shower trays, which are perfectly disguised under the tiles and the drain will not be visible at all.
The main thing you must always remember when dealing with water - it is a quality waterproofing. Any joints and assembly places are installed only with the use of gaskets and sealants. If even they are not provided in the purchased drain, it is better to buy the gaskets separately and additionally treat all joints with a special silicone sealant.
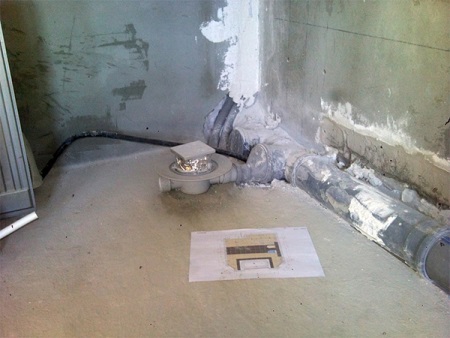
Installation of the drain usually begins with the installation of pipes, which must be firmly fixed in the tray so that no influences could not move it and thereby destroy the tightness and reliability of the system. Remember about the slope of the drain. If your tray will be lower than the drain, then the slope of at least 3 degrees can not be achieved, in this case, raise the level of the tray and provide the necessary slope of the drain. When the entire drainage system is assembled, set beacons height level of the inner space of the pallet. Beacons help to make the correct slope of the future pallet. Next, we proceed to the formation of the rough base.
Step by step instructions
Given that each individual case should be considered separately, and that all options for the peculiarities of your particular way of arrangement of the shower tray, let's take a typical example: the tray is made of concrete.
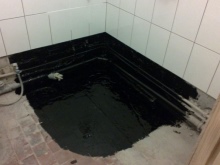
- The floor and part of the wall that will be adjacent to your shower must be thoroughly cleaned, waterproofed with a waterproofing composition, such as bitumen mastic with a high rate of adhesion.
- Then the drain is installed and the concrete screed is poured. The level of the floor must be such that subsequently laid tiles would be flush with the gangway. That is the thickness of the tiles plus the thickness of the tile adhesive. Make sure that the slope of the floor is directed directly towards the drainage hole.
- After complete drying, install a wooden formwork, the width of the board should be at least 4 cm, and pour the sides. Masters are advised to wait at least two weeks for a complete drying with a thick layer of poured concrete.
Caulking with the wall and finish waterproofing
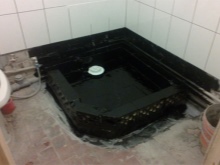
As already mentioned, waterproofing is the most important step in the construction of the shower tray. The first sealing of joints between the floor and walls should take place during the preparatory phase, when either a film or, better yet, several layers of roofing felt will be placed on the floor so as to completely close any gaps in the joints between the walls and the floor. Then the floor and adjacent walls are carefully treated with a waterproofing composition - it is applied as a primer mixture in an even layer. The required thickness of the layer is determined by the instructions on the package. At the joints of the walls and floor it would be ideal to lay a special waterproofing tape.
The next waterproofing layer is done after the base of the pallet dries, before starting the tiling work. Once again, paint with the same mixture, lay a special tape at the joints. After finishing work, treat all joints of the shower tray with the walls or fences with sealant.
Finishing materials and their installation
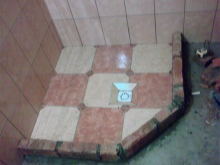
Independently erected construction can be finished to your liking, the only requirement for the decorative coating is moisture resistance and anti-slip properties. Information about these indicators can be read on the packaging of tiles or other finishing materials. Installing tiles on the floor and walls of the shower tray rim is no different from installing regular tiles on the floor. Take a notched trowel, apply tile adhesive, then press the tiles well and evenly. It is desirable that the joints between the tiles are minimal.

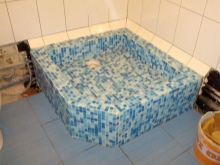
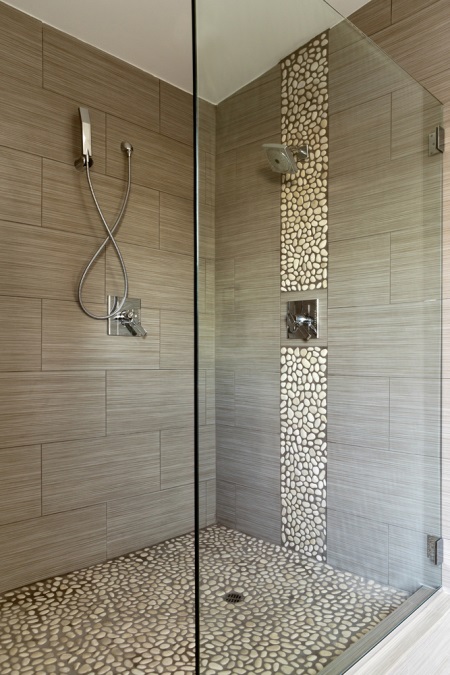
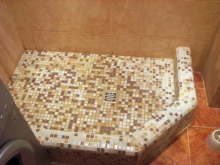
It is best to use mosaic tiles for pallets. It is easier to install, almost non-slip and gives the opportunity to exercise creativity. If the shower tray is adjacent to walls or partitions, you can completely finish the adjoining space with mosaics or place mosaic panels on the walls in harmony with the base.
After drying completely requires trowel joints between tiles or mosaics waterproof grout.
The corners of the board to avoid injury can be finished with special corners. Do not forget to pick up shower.
If you have all the right angles sustained, and the surface is well aligned, the mosaic will lie flat, beautiful and pleasing to the eye, and the shower tray will serve long and trouble-free.


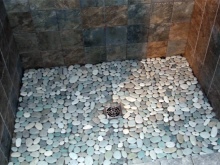
I like how the shower tray is lined with stones. Only how long is it durable? And so - and beauty, and foot massage))