How to make a water heater for villas with their own hands?
The presence of hot water in the house significantly increases the comfort of recreation out of town. That is why more and more dacha residents are trying to organize at least some kind of hot water supply on their six acres. Not everyone can afford a purchased water heater. Even if you pick up a suitable model at an affordable price, there is no guarantee that the device will work properly in dacha conditions, without good pressure in the pipes and a stable voltage of the power grid.

Another possible option is to try to make a water heater for dacha on their own. Homemade devices can work from a variety of energy sources. About the varieties of water heaters that can be assembled independently, we will talk about in today's article.
Electric
To begin with, it should be noted that it is possible to independently assemble electric devices of various kinds only if you are well versed in such equipment and have the necessary knowledge of electrical safety. Otherwise, the device made by you can cause harm to life and health of your household.
If you think that experience and knowledge allow you to make a water heater at home, we offer you a variant of the device, which can be easily assembled by yourself.
We will create our device on the basis of a device called "washer-dryer". It is a washbasin with an attached tank for water, which is equipped with a water heater. Such a device is quite inexpensive, in the area of two or three thousand rubles. Our task is to improve the "washer-dryer" by equipping it with a larger tank (120 liters) and a pump that allows you to automatically fill the tank.
- First of all, you need to find a suitable location for the tank. It should not interfere with the movement in the room. In addition, the tank should be positioned so that it is inaccessible to small children.
- Then we cut a hole in the cistern and insert the valve with a float - such as those used in toilet cisterns. To make the system work, the rod that holds the float, you need to make a little shorter.
- Next, connect the tank to the faucet sink or washbasin. It is most convenient to do this with a special hose from a washing machine.
- Install the heating element in the pre-cut hole for it. Seal the connection, using rubber gaskets. It is best to choose for this purpose a heater rated at 1.2 kW, equipped with a thermostat.
- On the electrical wiring install a safety switch with a pair of indicators, one of which will signal that our device is on, and the other - that the heating is in progress.
- For the system to work more efficiently, it is recommended to insulate the tank by wrapping it with insulating material. You can hide the water heater or give it a more aesthetic look by building a neat box for it.
With heating from the sun
More complex, but also safer to use, will be the water heater, working on solar energy. It can also be made with your own hands, but it will take much more time and a variety of materials than in the previous case. If this does not stop you, read the instructions for assembling a solar water heater below.
Required tools, materials and principle of operation
- glass wool;
- wooden bar;
- pipes with a diameter of 20 mm
- sheets of glass;
- square tube with a diameter of 20 mm;
- metal profiles;
- metal corners;
- glass insulation;
- sheets of thin metal;
- water tank of required volume;
- fittings;
- self-tapping screws;
- dowels;
- heat-resistant black matte paint;
- water-resistant plywood;
- water pipes;
- thermal insulation for pipes;
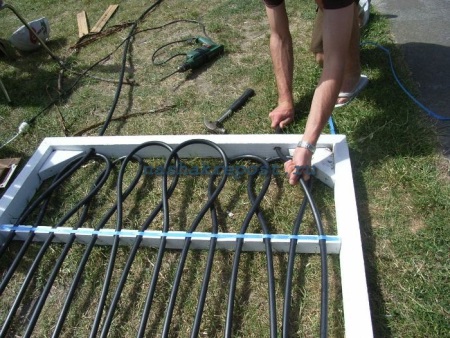
- pipe with a high degree of thermal conductivity (for the coil);
- drill;
- welding machine.
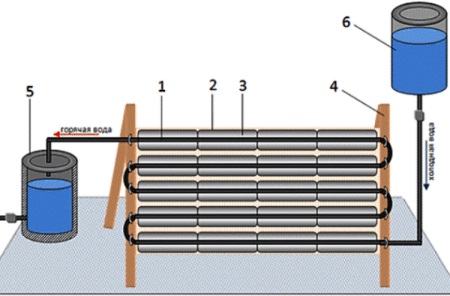
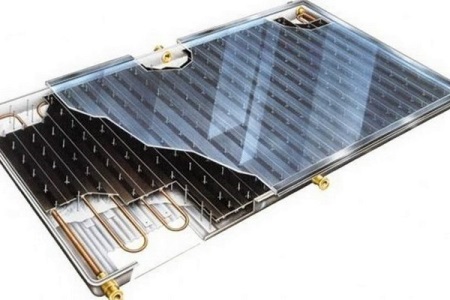
How to make a heat exchanger?
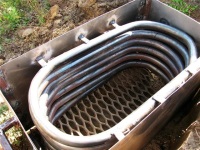
The heat exchanger is a vessel in which water circulates and heats up, equipped with two outlets. Through one outlet, cold water enters the vessel, and through the other, hot water pours out.
In order to assemble the heat exchanger, you must first make a coil. The coil is a spirally curved metal tube. It is needed in order to provide the most efficient heating of water.
The tube from which you will make the coil, should conduct heat well. The best products for this purpose are made of copper.
How to make an absorber for the collector?
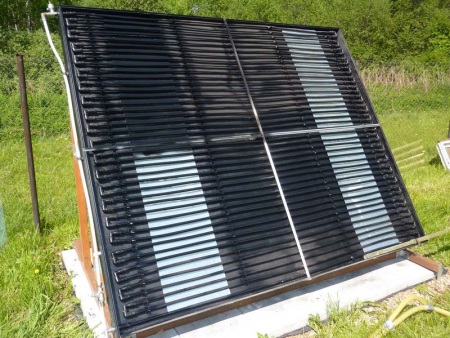
The heat exchanger we have assembled should be heated by solar heat. But for large volumes of water in the tank heated quickly and evenly under the sun, the area of the heat exchanger alone is not enough. It is necessary to build another, larger device, which will accumulate heat and transfer it to the water heater. Such a device is called an "absorber".
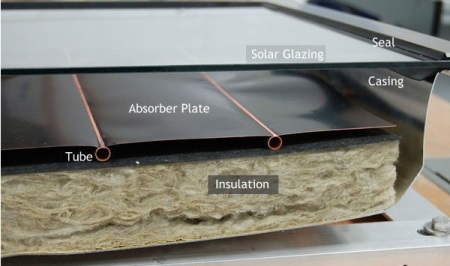
Absorber can be made of thin metal plates, which are known to heat up very well and retain heat for a long time. Tubes are placed between the plates, and glass sheets are placed on top. At the bottom of the structure is a thick layer of insulation, which usually acts as glass wool.
How to make a box for the water heater?
In order for our construction to hold well, plus was protected from the effects of external factors, it should be concluded in a box. The box will act as a kind of supporting frame, and provide additional insulation.

We will assemble the box from a wooden bar. Its height should be no less than 70 mm. The bottom is covered with sheets of moisture-resistant plywood, and the edges are insulated with the same mineral wool.
How to assemble a solar water heater?
Assembly of the device, which uses solar heat to heat water, we make in the following order:
- lay out the first layer - it will be a plywood substrate;
- Place the heat exchanger on the substrate;
- we lay the absorber on top of the heat exchanger;
- paint the absorber black;
- assemble the joist box;
- glass sheets are placed on top of the absorber.
Learn more about the solar collector and its construction in the following video.
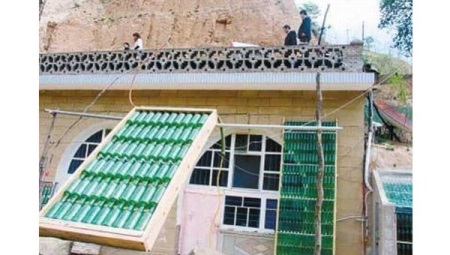
Water heating system from plastic bottles
Another interesting option of a water heater for dacha, which you can make with your own hands is a device for heating liquid, assembled from plastic half-liter bottles.
The set of necessary materials will be very accessible: all you need for work you can easily find at the nearest hardware store. So, you will need:
- sealant suitable for plastic products;
- connecting pipes made of polyvinylchloride;
- a pair of valves - valve or ball valves.
To work faster, we recommend that you also arm yourself with an electric drill.
- The first thing to do is to prepare plastic bottles. Rinse them thoroughly, freeing them from labels. Then in the bottom of each bottle make a hole with a diameter corresponding to the diameter of its neck. Note that all the bottles should preferably be the same shape and size - so work more convenient, and the design will look more aesthetically.
- The next step is to assemble the main element of our future water heater. We take two plastic bottles, and we insert the neck of one into the bottom of the other. Assemble a chain of about 10 bottles, then proceed to the next one. There is no limit to the number of chains. For maximum reliability, lubricate all joints with a sealing compound.
- Next, you need to find a suitable place to install the water heater. The south side of the roof is best for this purpose. If the roof is slate, the chains of bottles are placed in the hollows between the "waves".
- Skip between the bottles in a chain of flexible plastic pipe, chains connect to each other with connecting pipes.
- Install on both ends of the solar "battery" one outlet for water. We connect the system to the tank, from which the cold water will come.
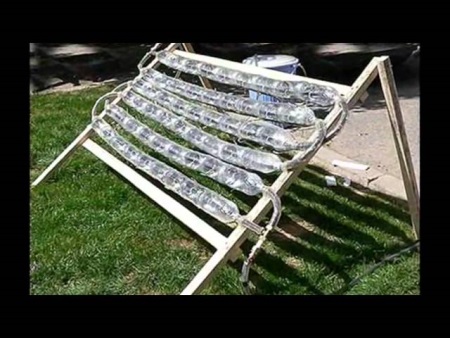
The performance of such a water heater, made with their own hands, is enough to heat up to 60 liters of liquid per hour. But heat loss will be very great, so in practice this indicator will be much less. If the volume of the tank is about 100 liters, then during a sunny day the water from it will warm up to 40-45 degrees two or three times.
You can visually see how the plastic bottle water heater works in the following video.


