How to wrap the bath and sauna cladding?
Construction of baths and saunas - a very responsible moment, requiring from dacha owners and owners of private houses comprehensive preparation. But when the building is erected and the basic insulation and waterproofing work is done, the time comes to give the room a finished look. Therefore, the question arises: how to wrap the bath? Consider how best to do it and in what sequence to act.
Choosing the cladding
Better than wood for cladding the interior rooms of the bath or sauna just did not come up. Therefore Bath cladding cladding will be everyone who conceived to get hold of such a necessary on the site room. But it is imperative to consider a number of features before you start construction.
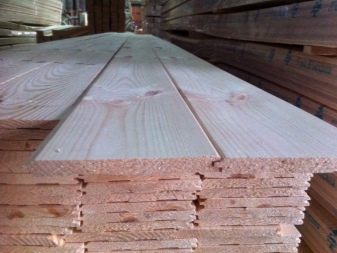
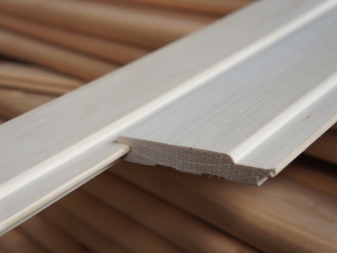
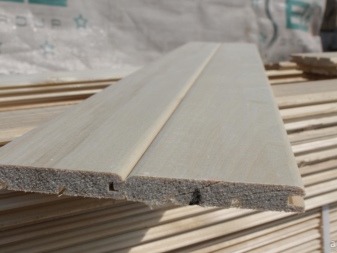
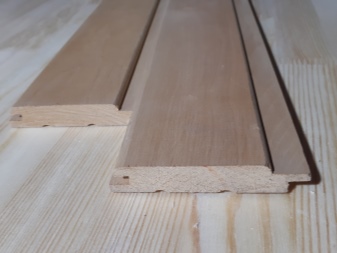
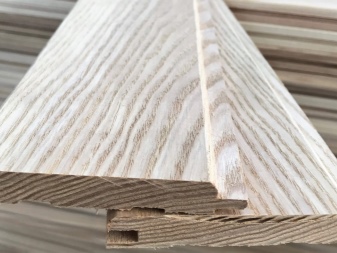
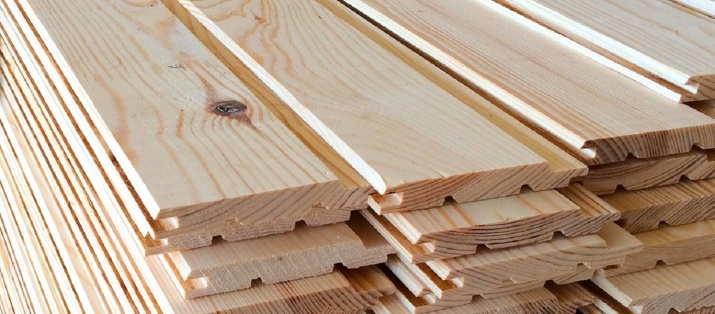
First of all, you need to choose the right wood for the bath, and thus take into account that the room is possible and the temperature drop, and high humidity. It is best to choose Euro lumber for finishing. This type of board has a more convenient "tongue-and-groove" system. In addition, slots are provided on the inside, which does not prevent the ventilation of air.
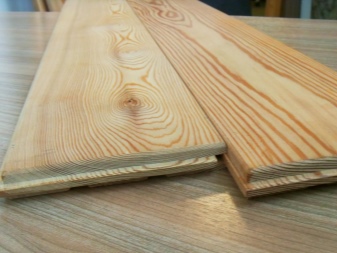
Another important point - Euro linings are already coated in advance to protect the wood from various external factors, the presence of which is inevitable in the steam room - moisture, steam, water.
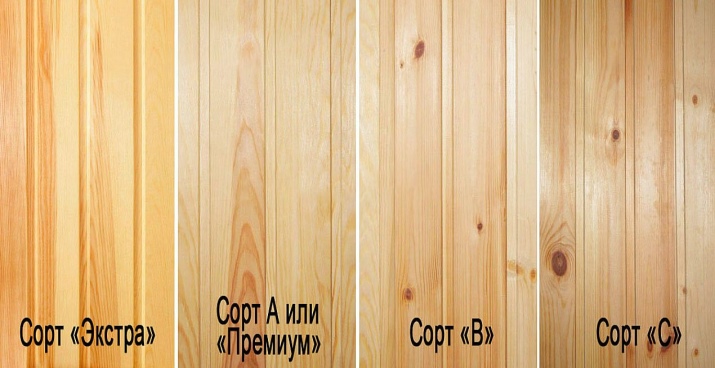
As for the species Only the highest grade or the first is suitable for the bath, because the board should be perfectly smooth, without knots, nicks or cracks. Savings in this case is inappropriate. Moreover, to bring the board to perfection, removing all of these defects, a time-consuming process.
Particular attention should be paid to the wood. And to do this, you should familiarize yourself in more detail with the characteristics of different species. In addition, it is necessary to take into account that for the steam room can be used one version, for the rest room another, and for the vestibule - the third.
Most often, for the arrangement of the steam room in the sauna or bath, hardwood species are used. The wood is resistant to high temperatures, which completely eliminates the occurrence of burns when touching the wood. The species that are most suitable:
- Linden is durable, looks beautiful, is resistant to various factors, and in addition, creates a favorable microclimate;
- Aspen promises ease of work and easy care for it, in terms of strength it is not inferior to lime, over time it can darken, but this defect can be eliminated using the process of sanding, the positive energy from this type of wood will also be provided;
- Alder is also a very good option, suitable for finishing any premises, but here the only disadvantage - its cost is higher than other species, so large areas to finish will be simply expensive;
- Oak is also an expensive option, but its advantages are that it is insured against rot, to cover the room is possible, pre-treating boards, the same applies to ash.
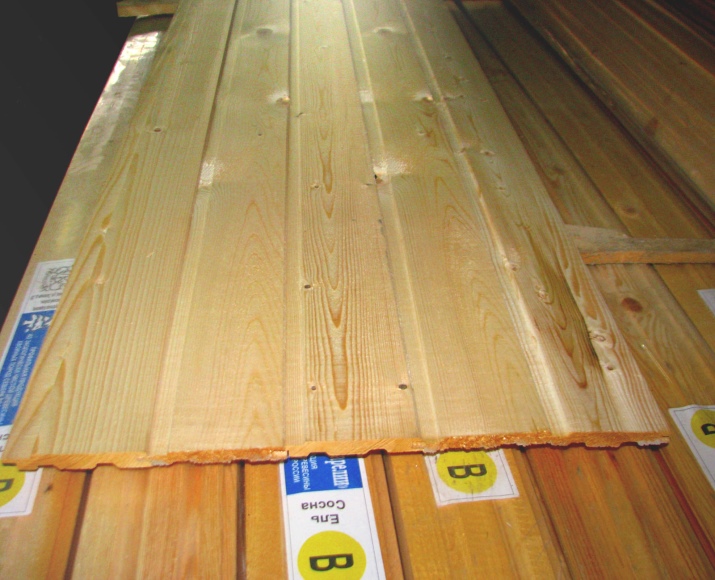
Conifers are not used for cladding steam room, because when heated strongly they release resins that are harmful to the body. But it is possible to use such boards in the shower, rest room or pre-bathroom.
They are easy to work with, they are not afraid of moisture, and the rich range of shades and the low price speak in favor of softwood. Flexibility and softness allows to formalize complex areas, where it is necessary to round some details. In addition, the light smell of pine in the rest room will only contribute to relaxation.
Ways of fastening
Choosing the necessary batten, it is necessary to determine how to mount it. It depends on the preferences of the owner, the idea of design, the thought-out project. But there are two main types, which are used most often.
Vertical
This method is considered by many to be uncomplicated. Due to this, the batten can be laid very quickly. With such fastening, condensate flows down unhindered and also rises up due to the micro capillaries of the wood. The tongue-and-groove system is less susceptible to water ingress with this arrangement of the linings. The heat is more intensively accumulated in the room. It is believed that this option is most suitable for cladding saunas, where the presence of dry steam is required.
Vertical arrangement of the boards is good to use in those rooms where the ceiling is low, but there is a desire to visually make the room higher. In addition, it will help to make the room more spacious, light-colored version of the wood.

Horizontal
With horizontal cladding, the construction is also insured against water ingress, the crate in the form of a vertical frame does not interfere with the air to circulate freely. For the classic bathhouse with the presence of a lot of moisture, the horizontal method is convenient because Bottom boards if necessary, it is very easy to replace if over time they deteriorate, and thus update the walls. With the vertical arrangement such manipulations will be impossible.
Given these nuances, you can choose the best option for yourself. But mostly it's just a question of external beauty, because both methods are good. Especially since some people can choose both the diagonal option, and the way in which different variants of laying boards are combined.
Horizontal cladding is suitable for any room. If it is very spacious, then dark types of wood can be used without the risk of somehow visually reducing the room.
And for compact rooms, light shades are suitable.
Different options for laying planks can be useful if you want to make the room zoning. You can, for example, use vertical laying, and using horizontal slats, lay out geometric patterns.
Step by step instructions
In order to properly decorate the sauna inside with your own hands, first you need to calculate the number of boards. Each owner will do this without difficulty based on the area of his room and the size of the board. In addition, any salesperson with accurate figures of all room volumes will calculate the right amount of material. In addition, Before you begin, it is necessary to stock up not only the linings, but also all the additional materials - for sheathing, insulation, ventilation, waterproofing. Do not forget about the additional elements - nails, staples, self-tapping screws and appropriate tools.

Trim
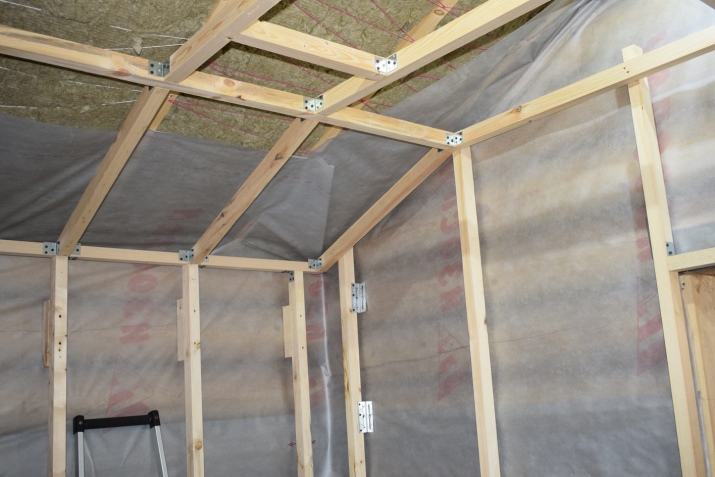
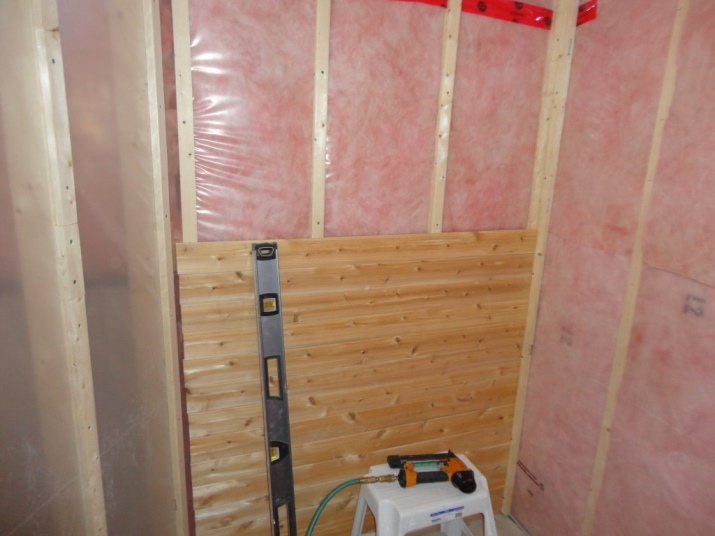
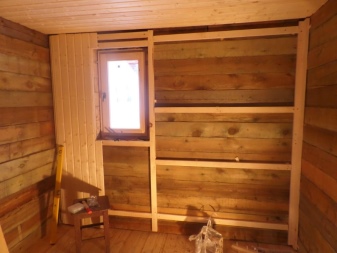
You should start the whole process with the sheathing. It is needed to properly insulate the room and ensure proper air circulation, which will protect the walls from mold and mildew. Thanks to the crates can make wiring that will be needed to organize the correct lighting.
For purlins use lumber, which must be covered with protective compositions specifically designed for wood. To wooden walls, the bars should be nailed. If the walls are brick or concrete, you will need screws or dowels.
Insulation
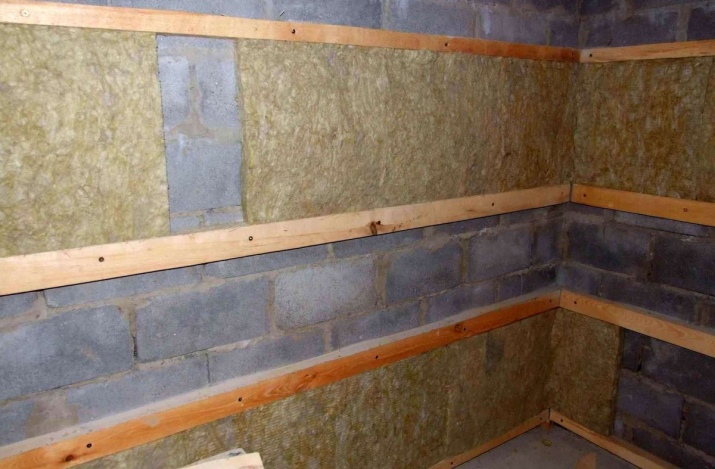
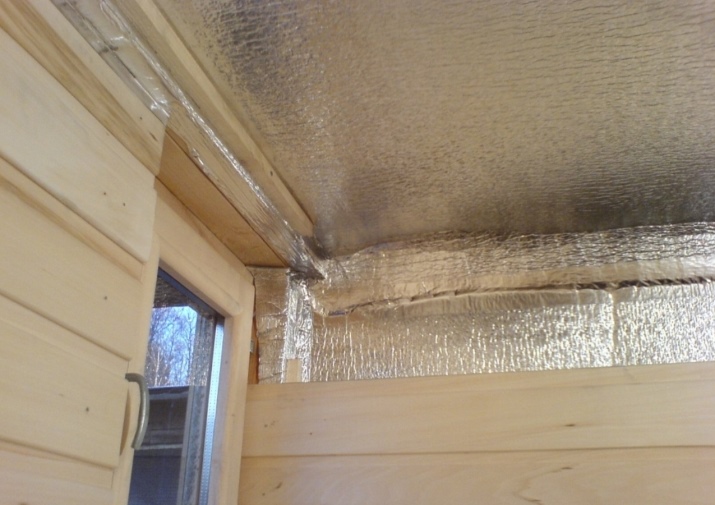
To insulate well from the inside of the room, you need to use several layers of material. In addition, the insulation should be well secured. First it is customary to put waterproofing on the walls, the material can be secured by the construction of purlins.
Wool is placed between the joists, and a foil film should be placed on top. This will make it possible to make a quality vapor barrier.
Be sure to leave a gap between the insulation and battens. You can finish the walls of foil basalt wool. This will greatly simplify the entire process.
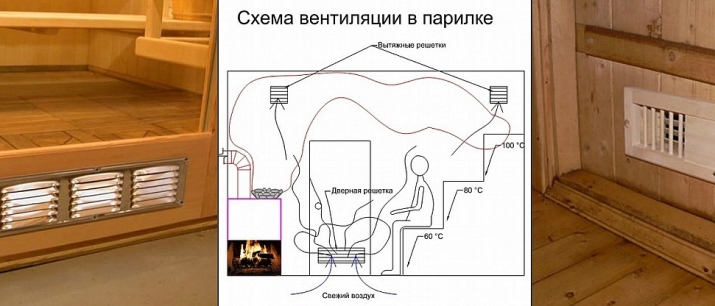
Ventilation
When we clad the sauna with battens, we must necessarily remember about ventilation. So even with the arrangement of purlins and insulation, it is necessary to provide holes for ventilation. One is placed on the ceiling, the other near the stove. Aluminum ducting will serve as an air vent. At the openings, you can install flaps to regulate the flow of air if necessary.
Installation
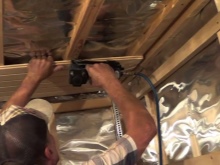
After all the preparatory procedures, you can proceed to the installation, choosing the best and most convenient way to fix the boards. In the bath, fasten the boards in a hidden way. If you leave the fastening elements outside, you can get burned by accidentally touching the place.
In addition, it spoils the appearance, and over time, because of the large amount of moisture in these places can appear rust.
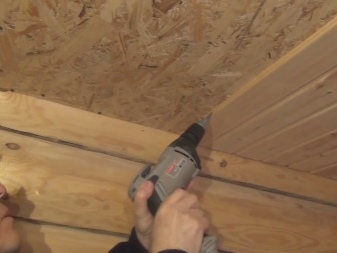
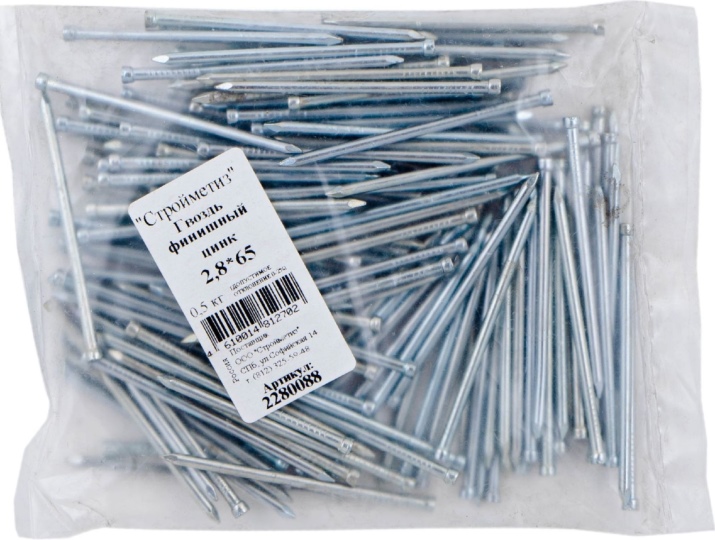
For fixing use nails, claymores or self-tapping screws. If the self-tapping screw is screwed on the front side, it can be closed with a plug made of wood, but the process will take a long time. When installing battens on the ceiling and walls, you need to provide holes in advance for ventilation and light fixtures.
Finishing different places
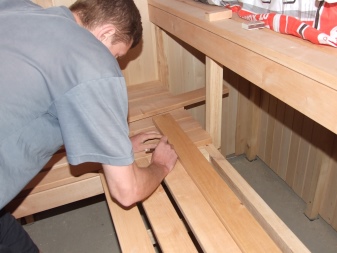
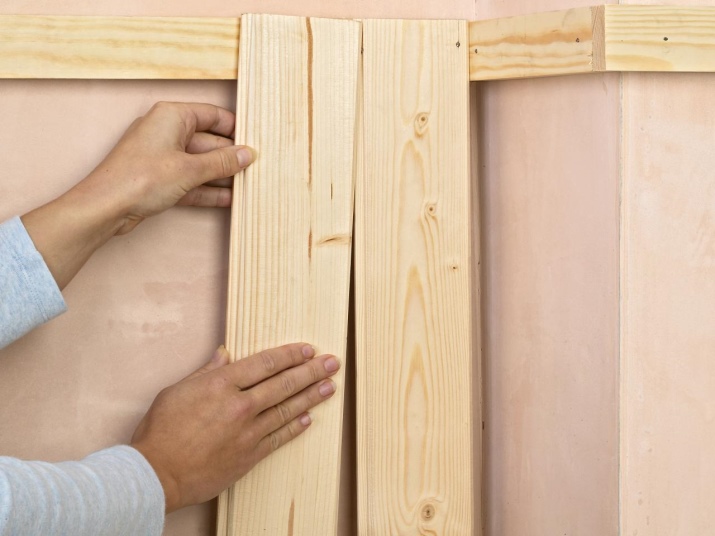
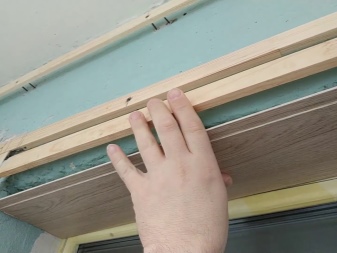
Installation of battens is carried out the same way in all rooms, whether it is a steam room or a recreation room. You should start with the ceiling, because thermal gaps should be left there, and the wall panels should be close to the ceiling.
Work begins at the entrance, moving inward, using nails or claymores. During the installation of the latter boards can be difficult. They are attached to the claymer or, using a countersunk nail, hammer it into the groove. The finish nail has no nail head, this will make the task easier, but then the place must be treated with emery so that there are no rough surfaces.
On the ceiling, there should be a distance of about 4-5 cm from the ends of the boards to the walls. The highest temperature occurs at the top, and the lamellae can "play" for a while. And in addition, the distance is required for normal air exchange.
Wall cladding cladding begins in a steam room or sauna from any corner of the room. And the rest of the process is the same as with the ceiling. Between the floor and the lower edge of the boards on the walls leave a small gap (no more than 3 cm). It is also necessary for normal air circulation, which will prevent the boards that are closer to the floor from rotting. Otherwise they will have to be renewed periodically. The task will be complicated if the linings are laid not just horizontally, but with some geometric pattern.
As for the junction of the entire surface of the linings, you also need to leave a gap between the boards. Wood can swell under the influence of moisture, shrivel, so there should always be a place for such metamorphosis occurring with wood. This is a normal and natural process, you just need to take this into account and properly install the boards. All decorative elements - skirting boards, corners and other fittings should not be glued. Only finish nails can be used for fixing, and then the necessary places need to be sanded down.
Doorways and window jambs
Openings for the doors are also decorated with clapboard, it is simply cut based on the desired dimensions. As for the windows, they are not always present in the steam room, but in the rest room they are always present, and sometimes even very large. To install the slope use a starter strip. In this case, one end of the wooden lamella will rest in the strip, and the second will be attached to the bar, of which the crate consists. Most often this method is recommended by specialists to use those who install metal-plastic structures in the building.
Another option, which can also be used, is to install a frame for the slope, trim it with battens, and then supplement everything with decorative strips to hide the places where the boards adjoin to the window. This option is used more often by those who give preference to wooden windows in the bath in all rooms.
Washroom and anteroom
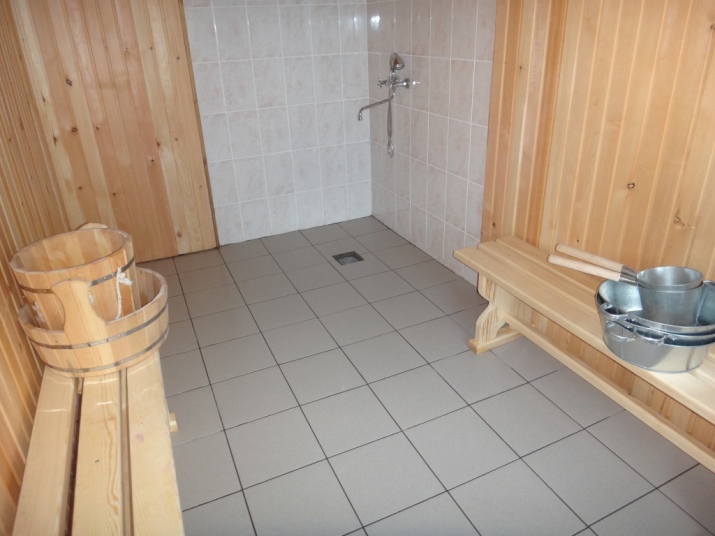
Even if it is decided to finish the whole bath exactly with clapboard, you can slightly deviate from your principles in the washing room, and the appearance of the room and its functional qualities will not deteriorate in any way. Everything will look very good if properly arranged, and the moisture will not damage the structure in any way. For this purpose it is enough to use plastic linings or ceramic tiles instead of wood.
Both can be found with a surface that imitates wood. Thus, the overall concept will not be violated, but these materials are easier to install, and they do not need to be pre-finished and finished.
However, if desired, you can also install linings in the washroom, just it should be treated more carefully. As for the pre-bath, the laying is the same as in all other rooms.
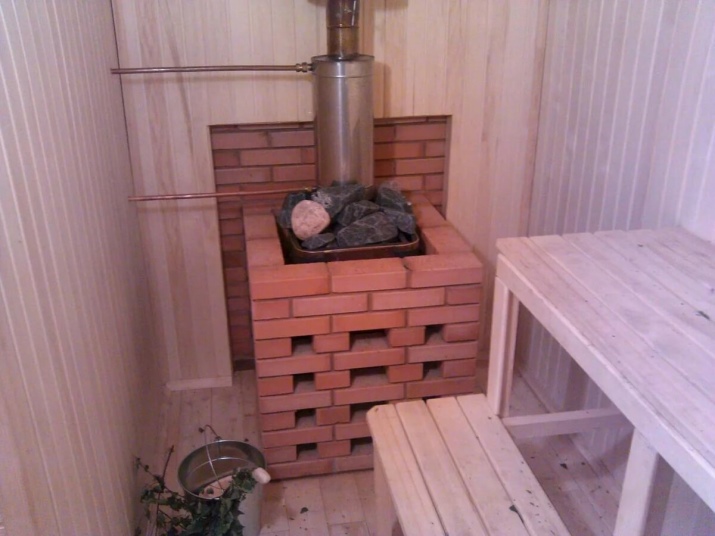
Near the furnace and the sauna heater
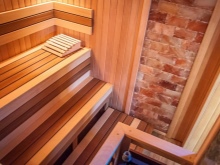
Install batten near the furnace is not allowed. Here will be relevant and appropriate surfaces of brick, stone. Even a metal sheet will do. On the ceiling above the stove is also installed a protective screen. The chimney pipe should not adjoin to wooden surfaces. But near the sauna heater, batten is appropriate, especially hardwood. Wood will not heat up as intensively as stone. This will protect the visitors of the sauna.
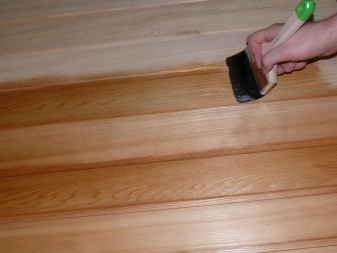
Finishing treatment
With the finishing treatment it is necessary to be extremely careful. Not all compositions are suitable for the bath. Do not use varnishes, because when heated, harmful substances will be released into the air. Some people generally prefer not to treat the coating in the steam room. But if you still want to protect the wood, you need to use compositions on an introductory basis or with the use of wax.
As for the wax, there you can apply a coating in several layers. In the rest room and pre-bath you can also coat with compositions containing varnish. Once everything is ready, you can think about decoration, install fixtures, think about other decor. In the recreation room, you can place everything you need and decorate the room to your liking.
Examples
Despite the fact that the inside of the bath is arranged traditionally, you can make each room individual and very beautiful. It all depends on how well thought out the installation of battens and the design of the room with the elements of design. You can look at many examples before you come to understand how to arrange your own bath.
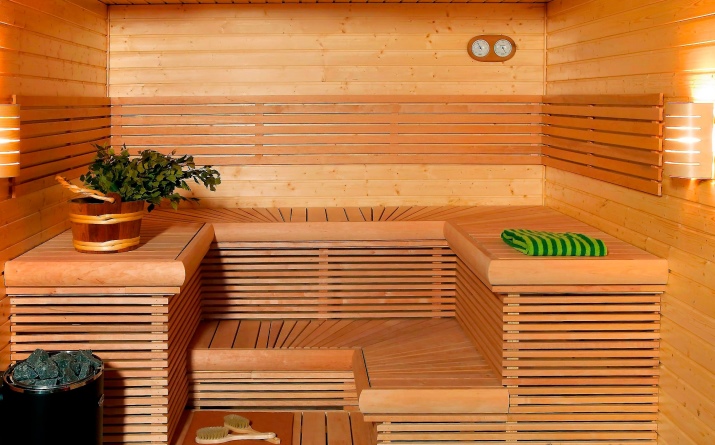
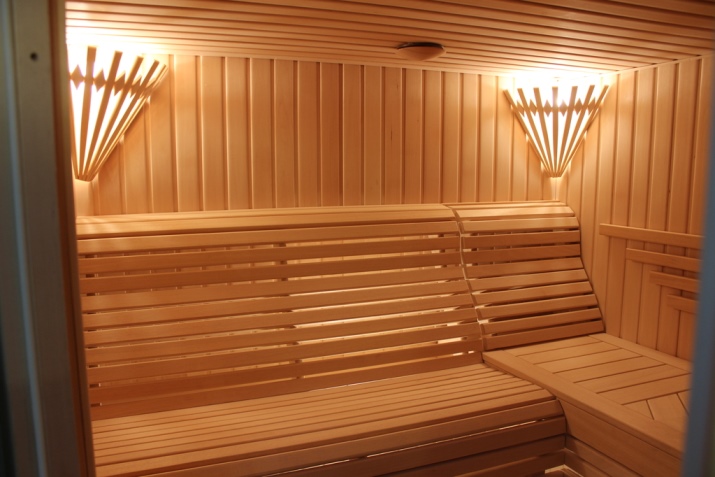
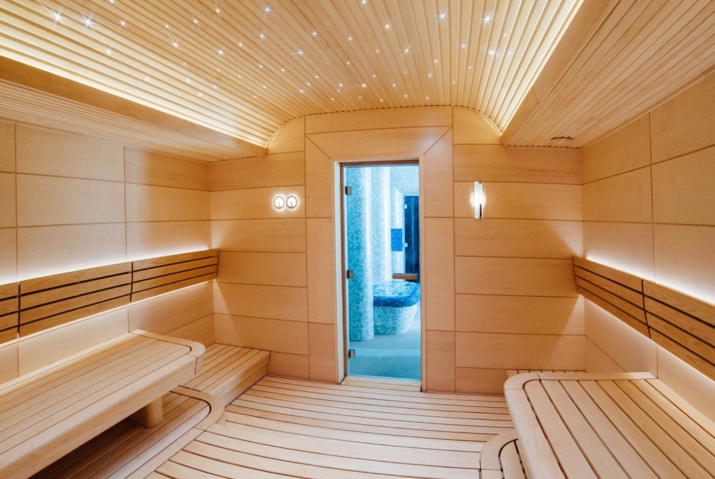
- A good example of how a vertical design looks good, complemented by a horizontal one. The darker version of the battens is successfully complemented by the lighter horizontal panels. Light fixtures add coziness to the room.
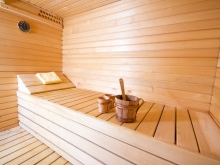
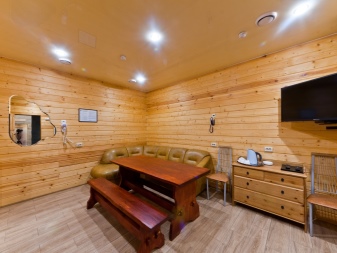
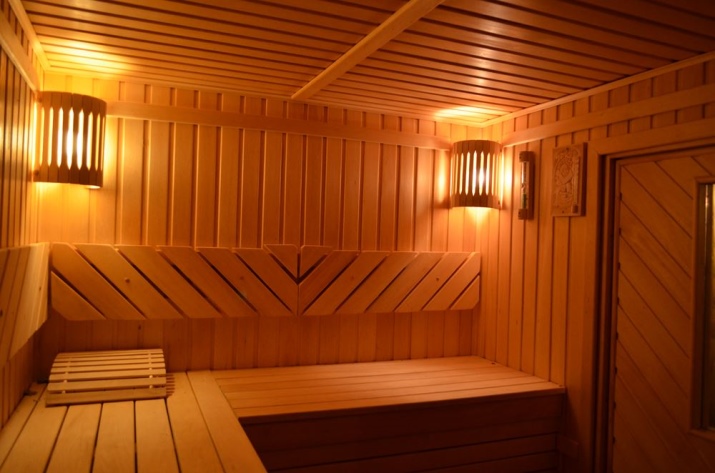
- In this case, vertical paneling is used on the walls. While in the design of the bench the boards are laid horizontally. The original lighting fixtures are also decorated with wood.
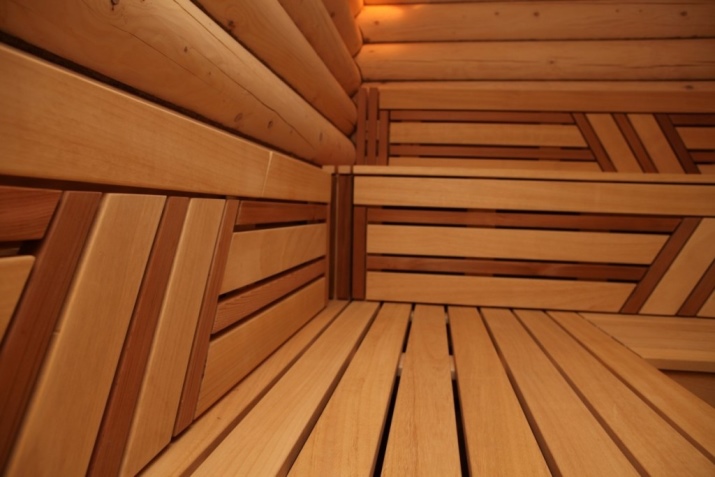
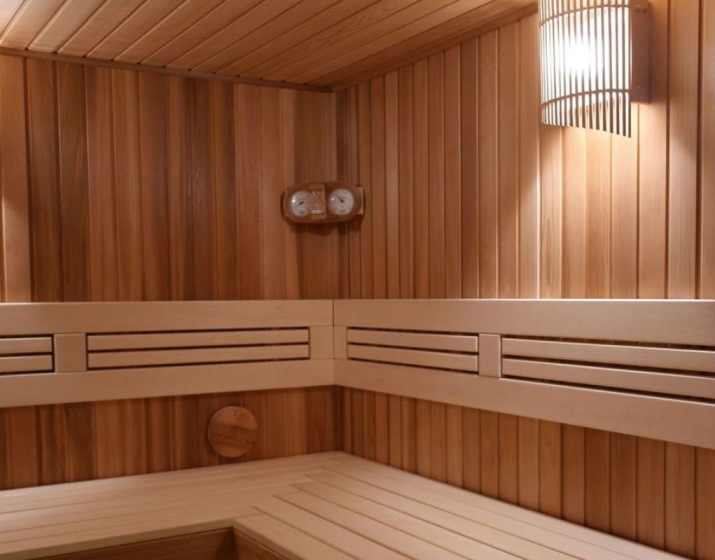
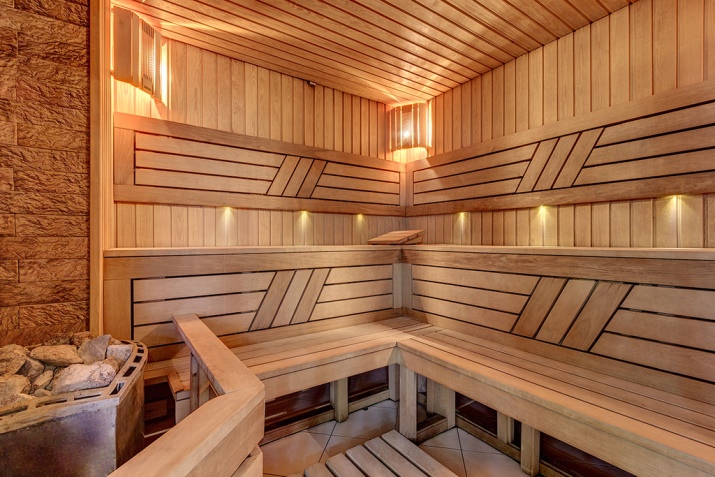
- Everything looks harmonious in this steam room as well. The ceiling boards are laid horizontally, as well as the seating areas. The walls are highlighted by vertical battens. But here there are also decorative elements on the wall and door, where the battens are laid diagonally. Fixtures successfully fit into the overall picture.
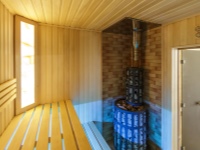
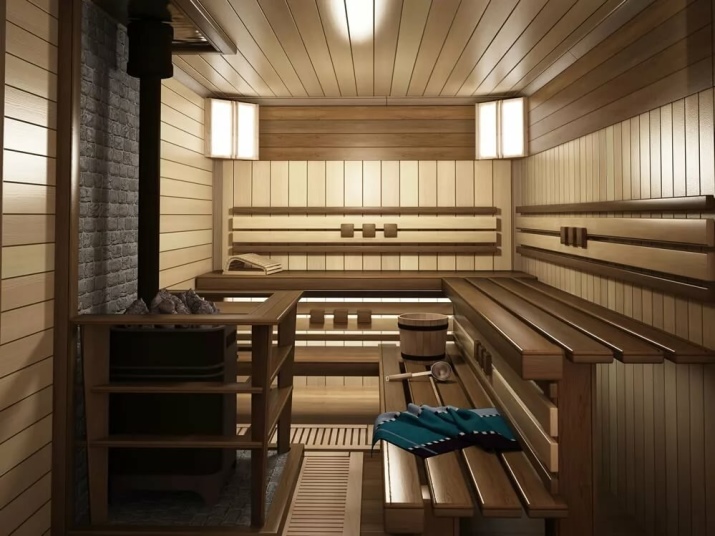
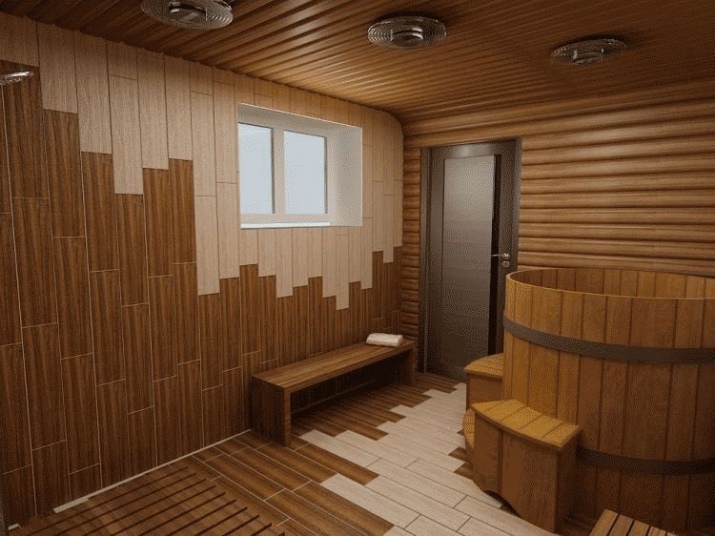
- A beautiful and original variant, where both vertical and horizontal solutions are used. Very properly fenced stove with a wooden structure, which looks beautiful and meets the safety standards. The brickwork on the back wall near the stove follows the same principles.
- A good solution with the use of different ways of laying the boards. The overall vertical background is diluted with horizontal boards with the inclusion of diagonal elements. The lighting is beautifully thought out. The stove is equipped in accordance with all safety regulations. Brickwork organically complements the overall design.
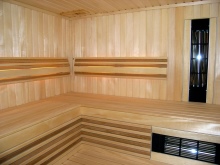
- Very beautiful looks batten of different sizes and configurations. Thanks to this you can create a unique design in the room.
- This is how original and stylish the washroom can be designed. In this case, part of the wall is decorated with clapboard, part of the wall with plastic panels, on the floor - tiles that mimic wood. And all this in general creates a harmonious combination. Everything is thought out in detail. Barrel, benches, lighting - everything is subject to a single concept.
- And this option is quite appropriate, where the place, most exposed to water, is decorated with tiles, and all other surfaces are lined with clapboard. On the floor will also look best tile.
How to cover the bath and sauna with clapboard, see below.


